How to Tile a Shower Like a Pro
One of the best ways to make your home feel more personalized and up to date is by replacing tile in your shower. Tiling a shower yourself is a great way to save money and add value to your home all while adding your own personal touch that you get to enjoy every day. In this article, we’ll cover how to tile a shower, step by step.
Tools You'll Need
Before we get started, gather your supplies. Below is a complete list of tools you’ll need to tile a shower:
- Gloves
- Sponges
- Buckets
- Mixing drill
- Trowel
- Tile cutter
- Level
- Tile spacers
- Measuring tape
- Marking tool
- Drill
- Box knife
- Clean microfiber rags
- Hole saw
- Market
- Grout float
- Margin Trowel
Step 1: Prepare Your Space
Tiling a shower can be a messy job. If you are doing the demolition of your old shower tile yourself, you will want to make sure you protect the work area.
Shut off your AC/HEAT, lay down tarps and floor protection along the walking path, and hang plastic over surfaces where you don’t want fine dust to settle.
If tiling over a tub space, you may want to protect the surface of your tub with a tarp, tub protector, or piece of plywood to avoid chipping and damaging your tub surface.
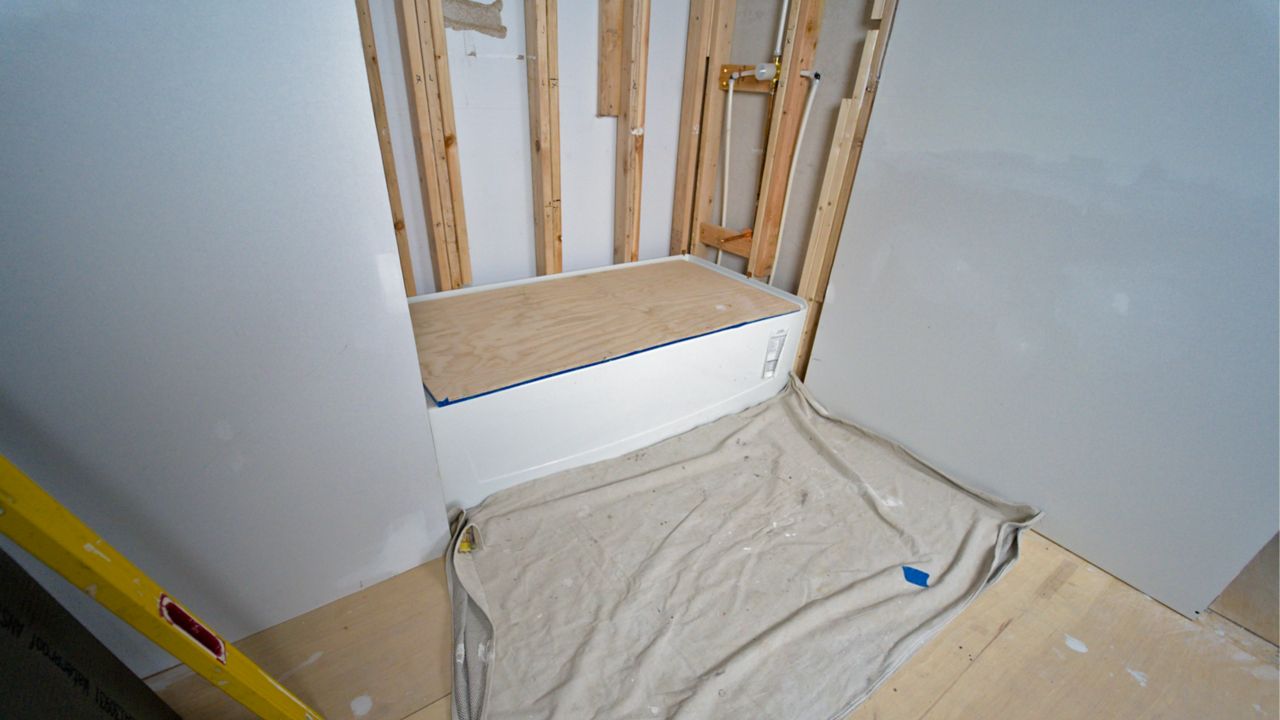
Finally, make sure you always wear appropriate protective equipment, like a mask, gloves and eyewear, for your safety when performing the demo of your bathroom.
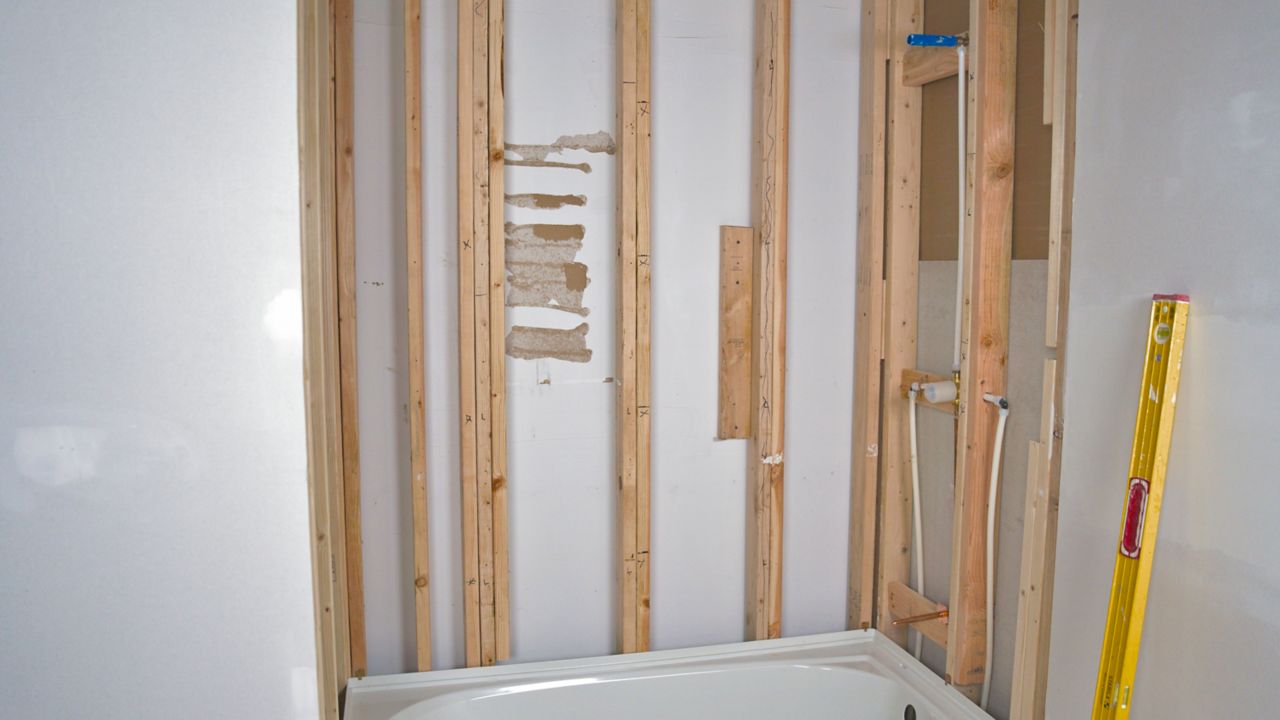
Step 2: Wall Prep
When you are done with demolition you will be left with bare studs. These studs play an important role when tiling a shower, and we want to make sure they are all flat and free of high or low spots before hanging our tile backerboard. Not doing so can lead to lippage in our tile installation.
Here is what you need to do to get flat walls for tiling your shower:
Check Studs
Check each stud (up and down) using a level. Make sure you are using at least a 5-ft. level. It’s even better if the level is the length of the stud itself.
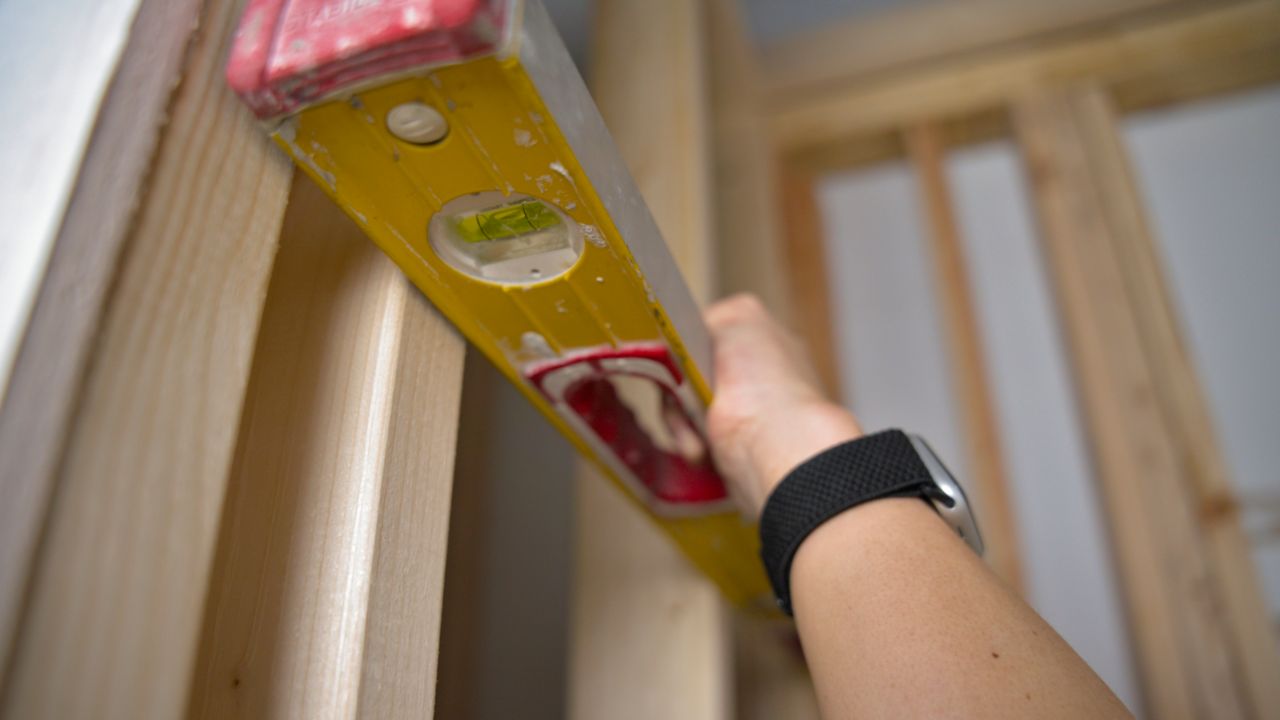
You will want to check along the length of the wall for any studs that are out of plane with your straight edge.
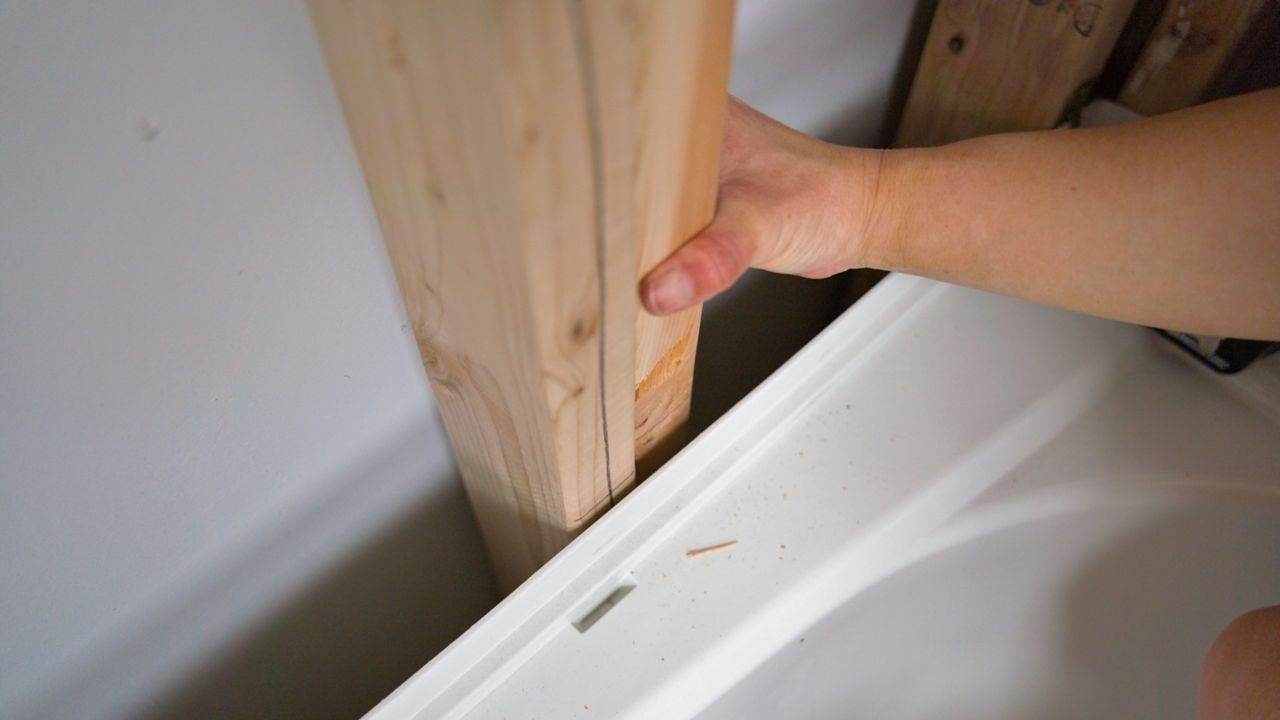
If tiling to a tub (like in this example) you will want to also make sure that all studs are touching the top of the tub flange.
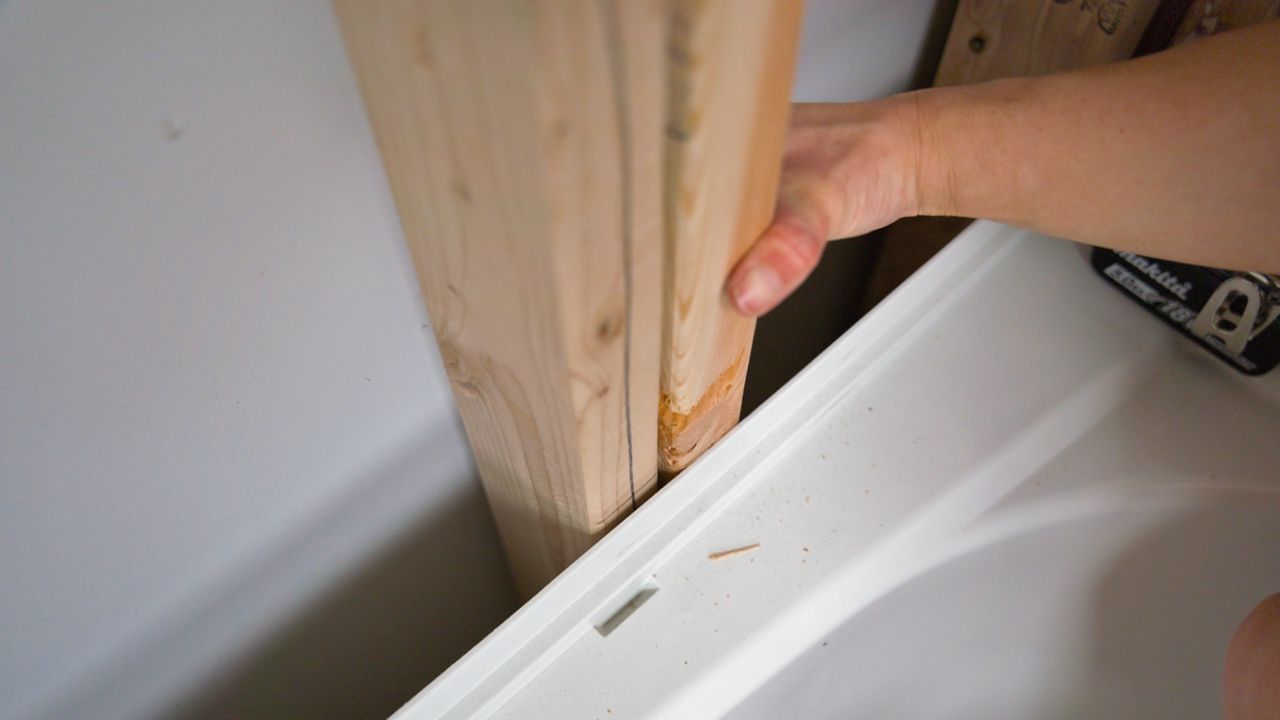
Align Studs
If any studs are out of plane or not touching the top of your tub flange, you will need to sister studs together. To do this, simply screw a new stud to the existing stud while making sure the new stud is touching the back of the tub flange or in plane with your other studs.
Step 3: Waterproof the Shower Walls
Waterproofing the shower is a vital step to any shower build. If you want your tile installation to last, you need to make sure your shower is truly waterproof in order to prevent mold growth and avoid costly water damage.
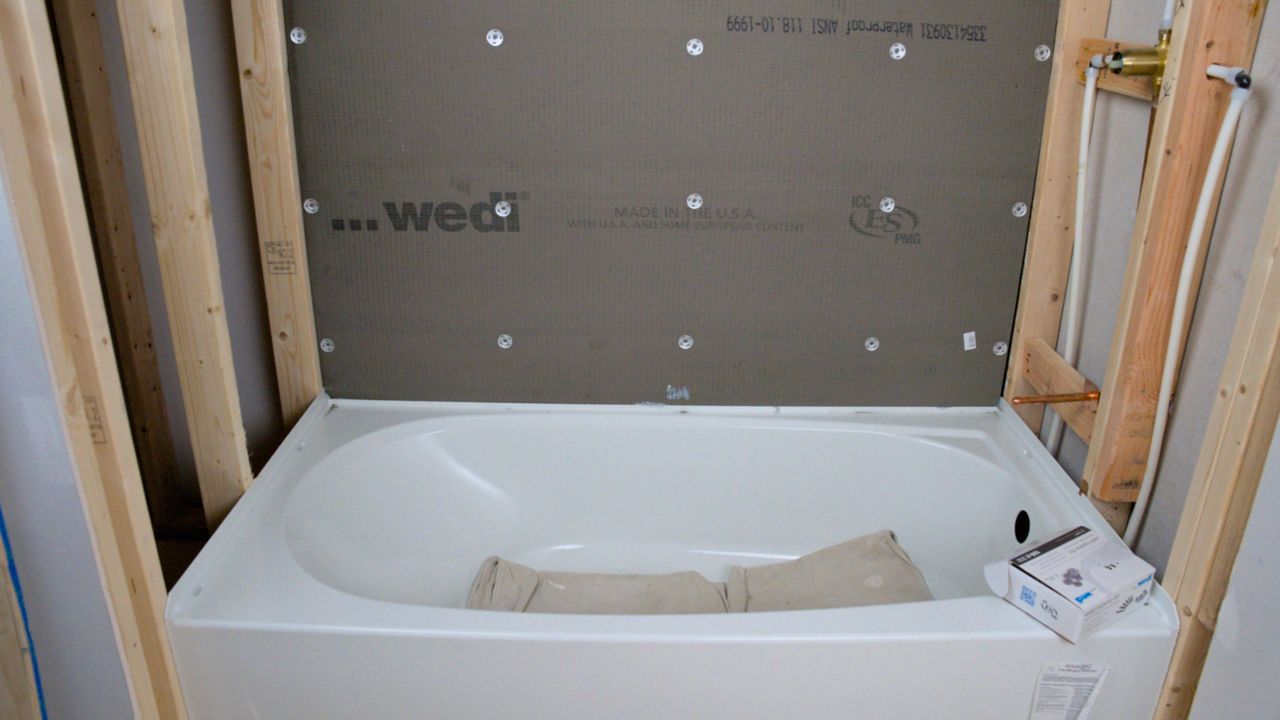
For this demonstration, I am tiling above a tub, so I don’t need to build a shower pan. If you are tiling a stand up shower and need to build a shower pan as well, I highly recommend a complete shower system like the Wedi system I am using here. They have step-by-step installation guidelines, warranties, and require far fewer steps than older/traditional methods for waterproofing a shower.
How to Install a Shower Wall Kit
Measure, Mark & Cut Boards
Starting on the back wall, measure the width of the wall. Mark your measurements on the building panel and use a straight edge to make your cut line.
Using a utility knife, score along your line. Using two hands, snap the board along the score line and cut the back of the board again with your utility knife to complete the cut.
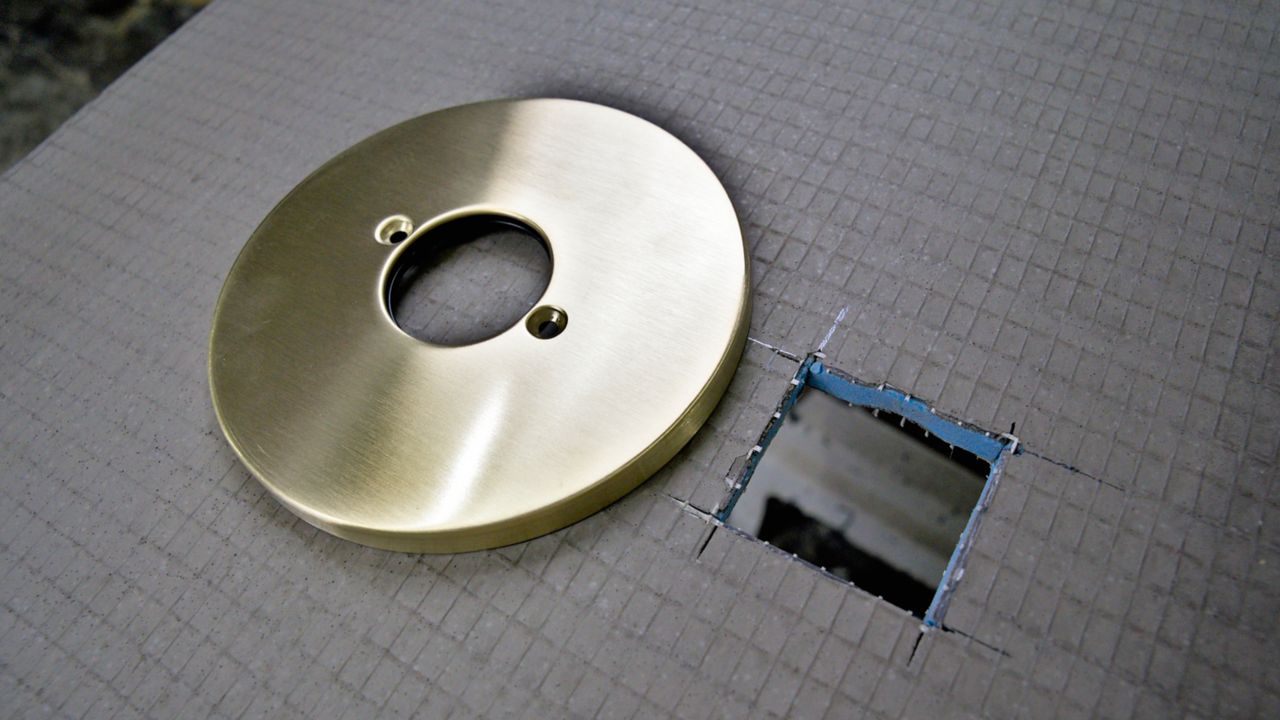
Cut Around Fixtures and Flange
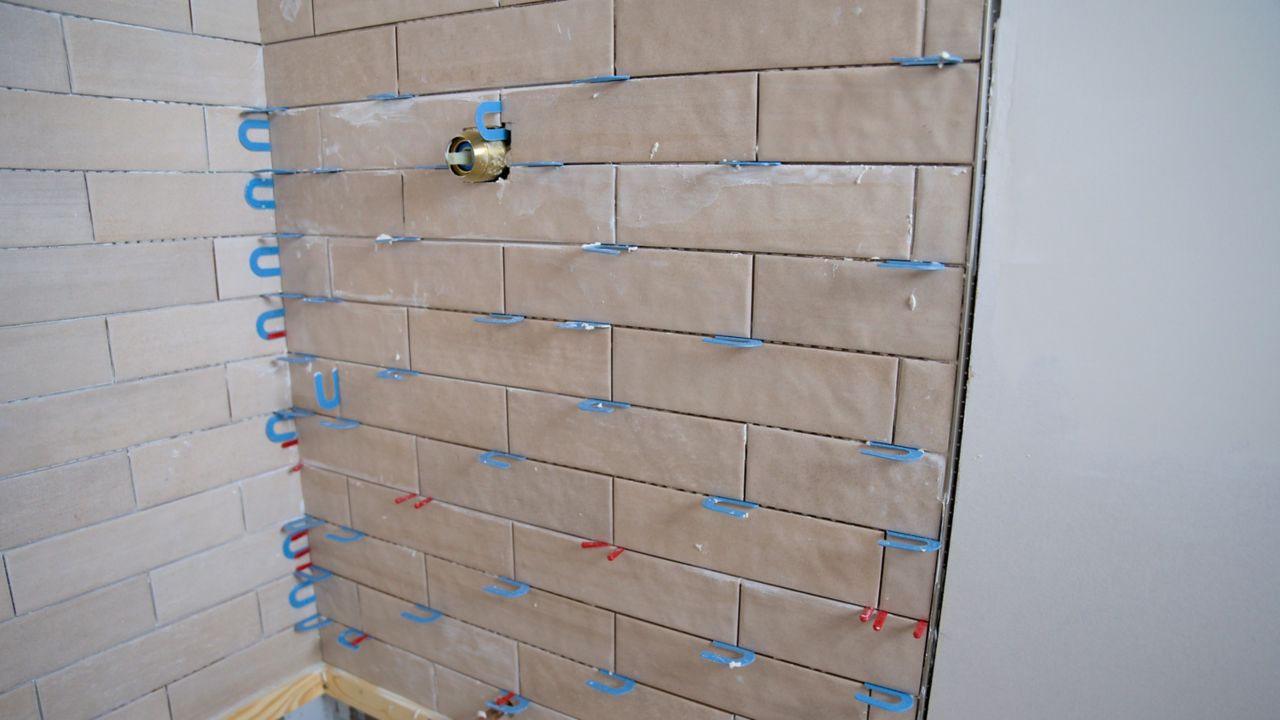
To cut around the valve, shower head and tub spout, you can either cut out a square using your utility knife, or use a hole saw bit on your drill to cut a circle of appropriate size. Make sure your shower valve cut is large enough to fit around the valve, but not so large that the finished plate cover won’t cover it.
Since we are tiling over a tub with a flange, we’re going to notch out the back of the board so it sits flat to the studs. First, score the back of the board to the depth of the tub flange, then fillet the back of the board with our knife, which allows space for the tub flange to sit behind the board.

Start With the Back Shower Wall
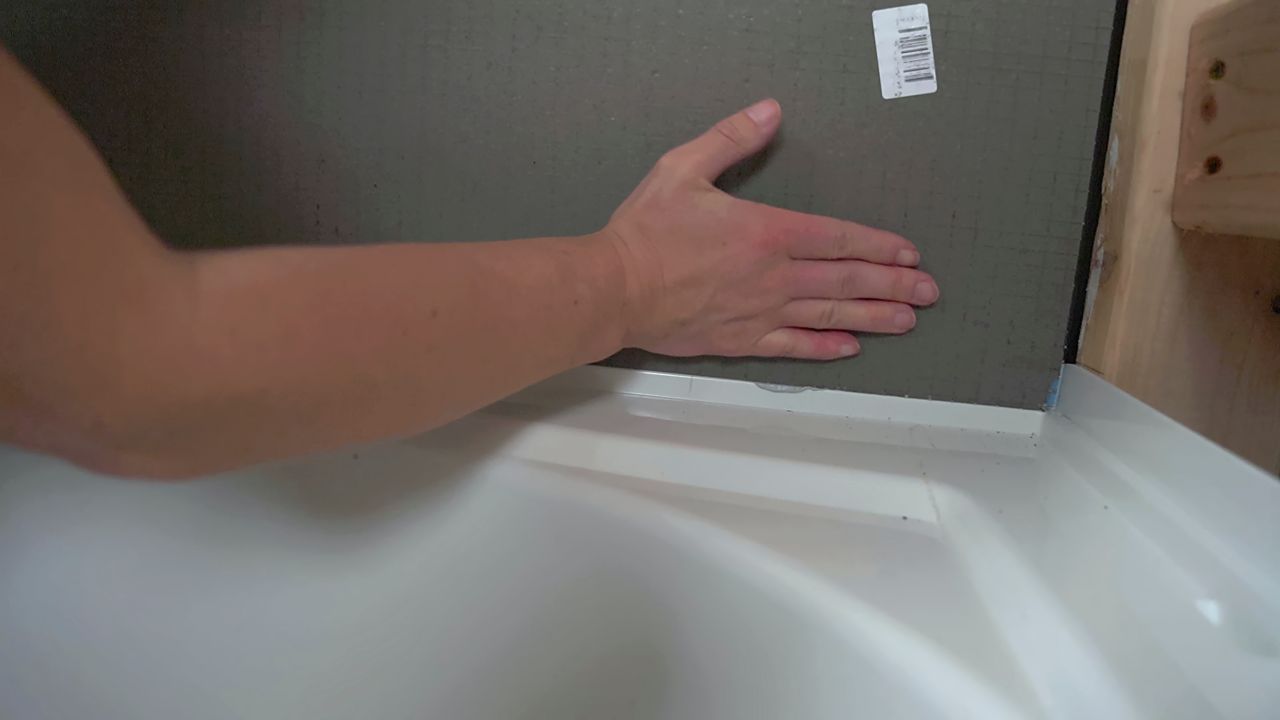
Before hanging the bottom row of boards over the tub flange, add waterproof sealant all along the flange to ensure the seam is watertight.

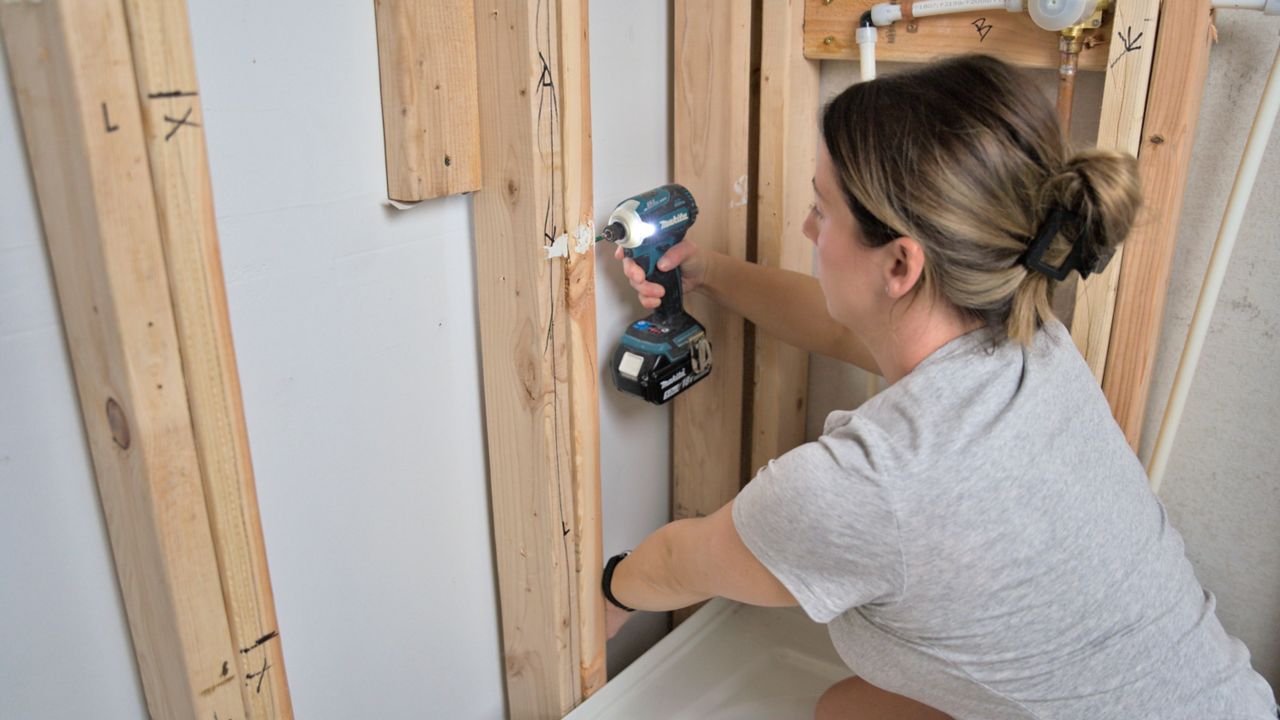
Place your board on the first wall, ensuring it sits flush on the flange and embeds in the waterproof sealant by pressing down firmly along the board and flange.
Next, secure the board to the wall. For this installation, I used the approved screws and washers placed 12” apart.
Finish Back Shower Wall
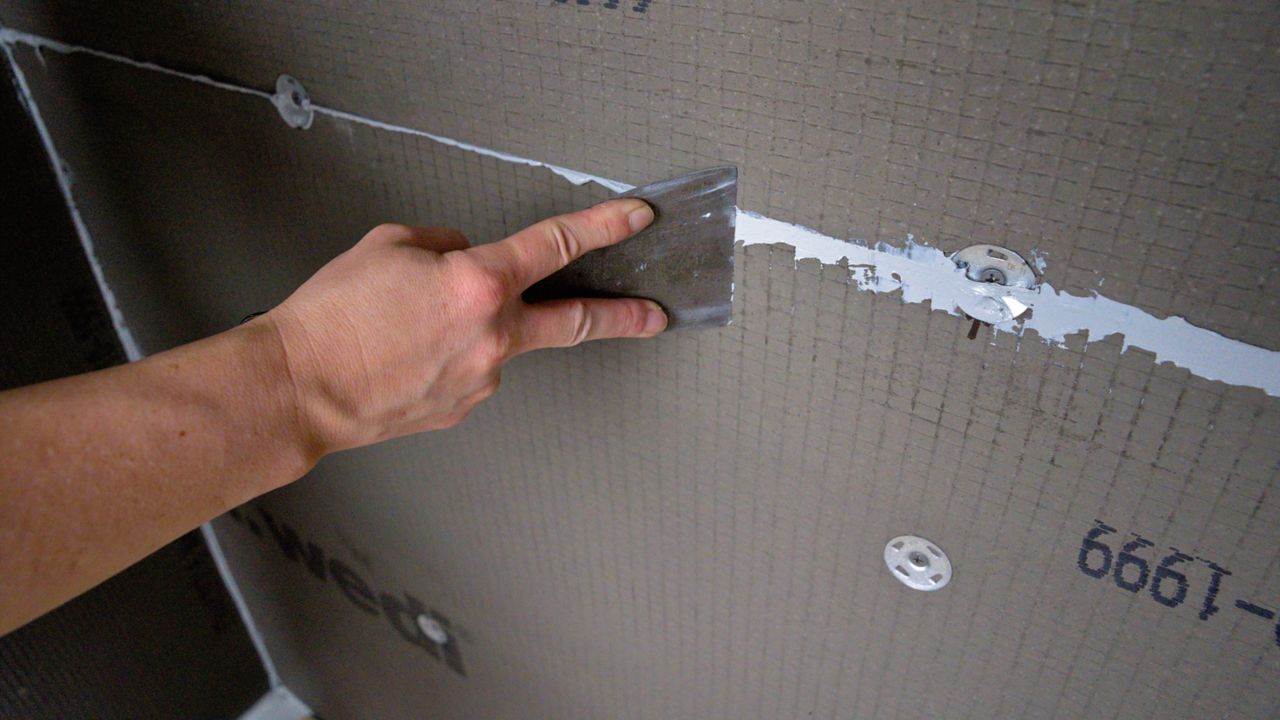
After hanging the first row of boards, and before hanging the next row, add sealant between the board seams and to interior tub corners where two boards will meet.

Hang the next board, continuing to place screws 12 inches apart. Use your putty knife to spread out any excess sealant along the joints so that it lays flat.
Install Side Walls
Once you complete the back wall, you can move on to the side walls, repeating the same steps to install the boards. Once you start your side walls, it’s very important that you apply sealant on the inside corner before placing your next board. This ensures a watertight connection between the two walls.
Finish Waterproofing
To waterproof screw holes, use the waterproof sealant and a putty knife. Begin by applying a dime-sized amount of sealant to each screw hole and spreading evenly over a minimum of 2 x 2 inches square.
Finally, along the seams, inside corners, and where the walls meet the tub, add more sealant and spread evenly using your putty knife.

Before moving on to the next step, take a moment to check that all screw holes, seams and inside corners are covered evenly with sealant.
Step 4: Choose Your Spacer and Trowel Sizes
Before deciding on a layout and setting your tile, first choose your spacer and trowel sizes for this project.
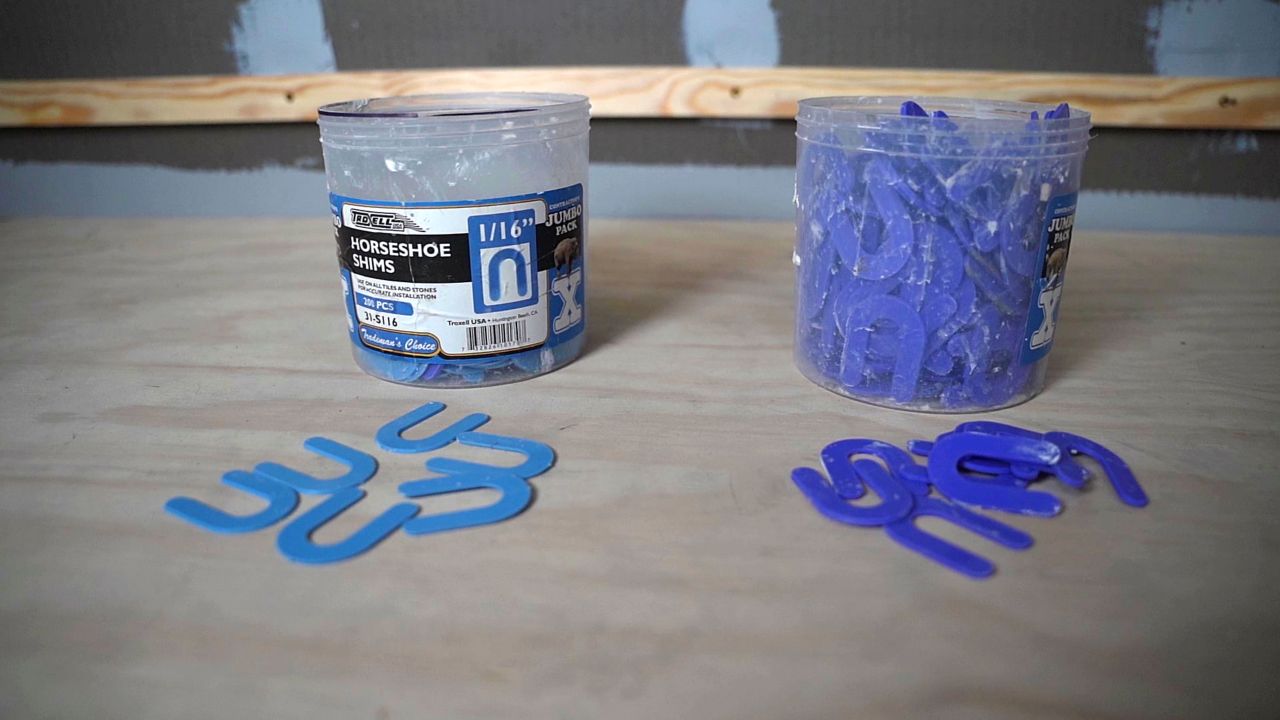
Some tile boxes will reference which spacer size you will need for your tile. Make sure to follow their guidelines, as some tiles have variations in sizes and not following this can result in an installation that has uneven grout joints.
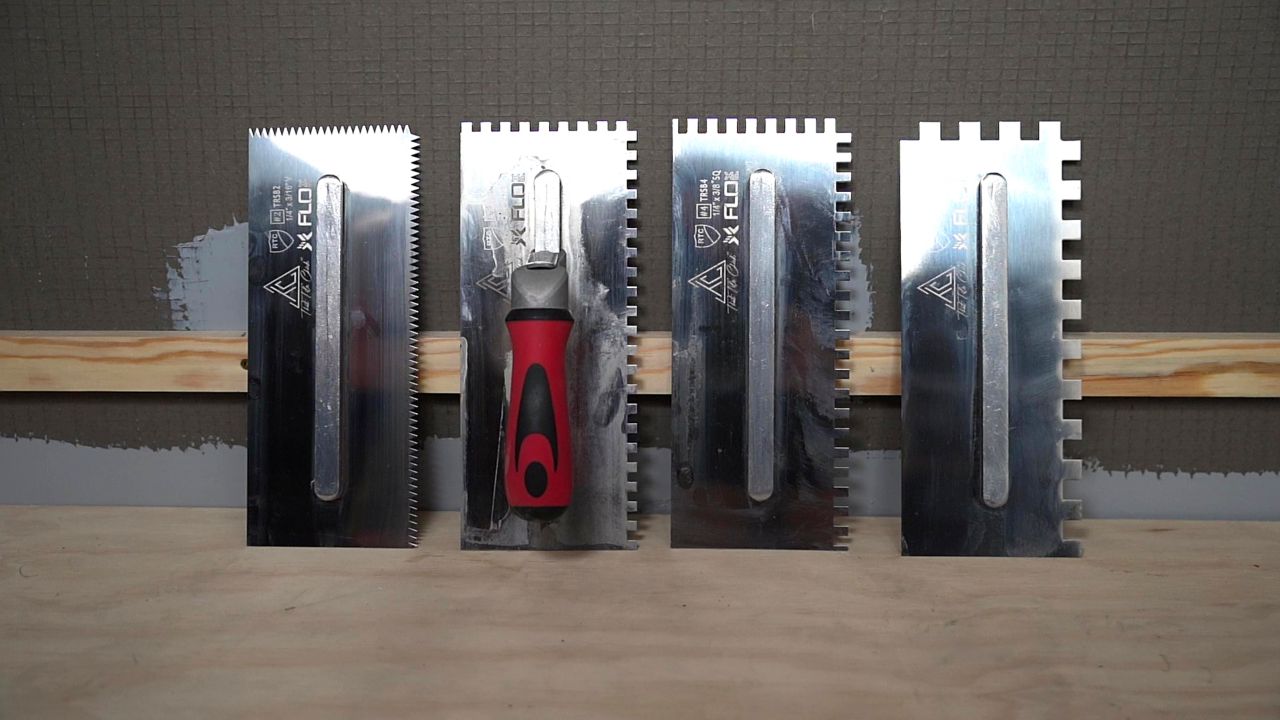
Choose a trowel size based on the size of your tile. Here are some guidelines you can follow for choosing a trowel size:
- Use a 3/16” x 1/4" V-notch trowel for mosaic tiles that come on a sheet
- Use a 1/4" x 1/4" square-notch trowel for tile sizes 4” to 8”
- Use a 1/4" x 3/8” square- or U-notch trowel for tile sizes 8” to 16”
- Use a 1/2" x 1/2" square- or U-notch trowel for tiles 16” and larger
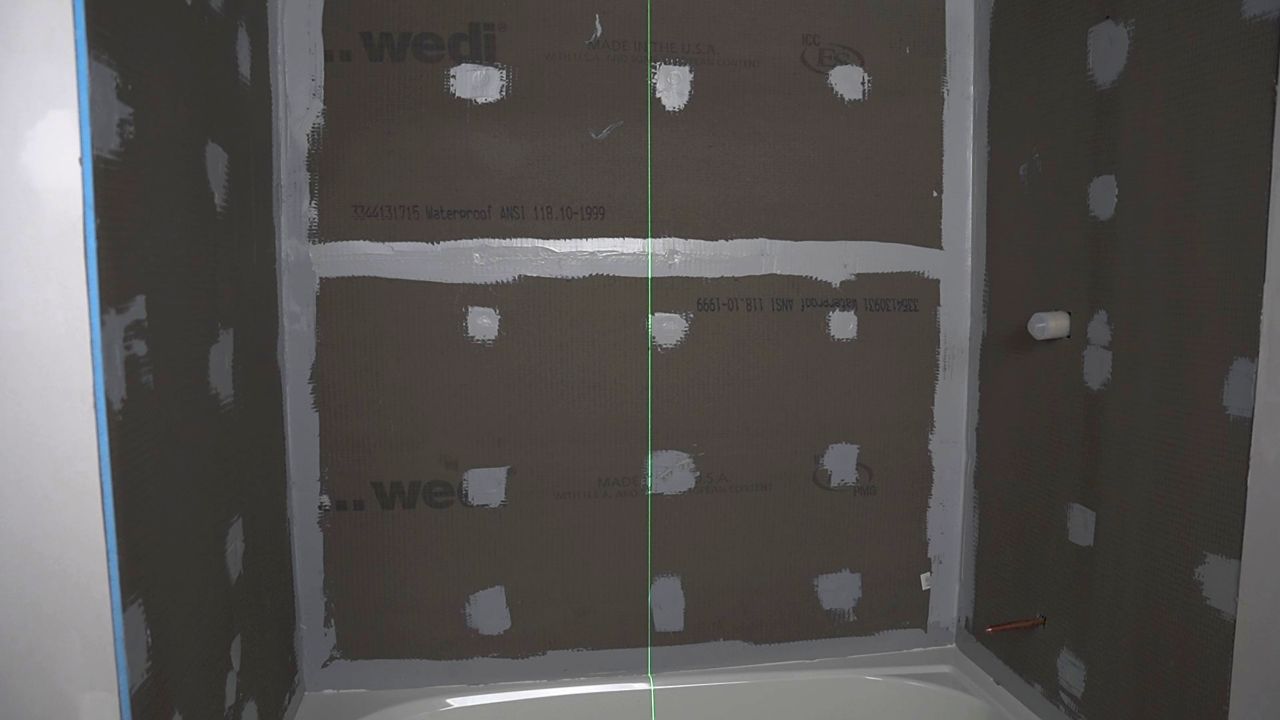
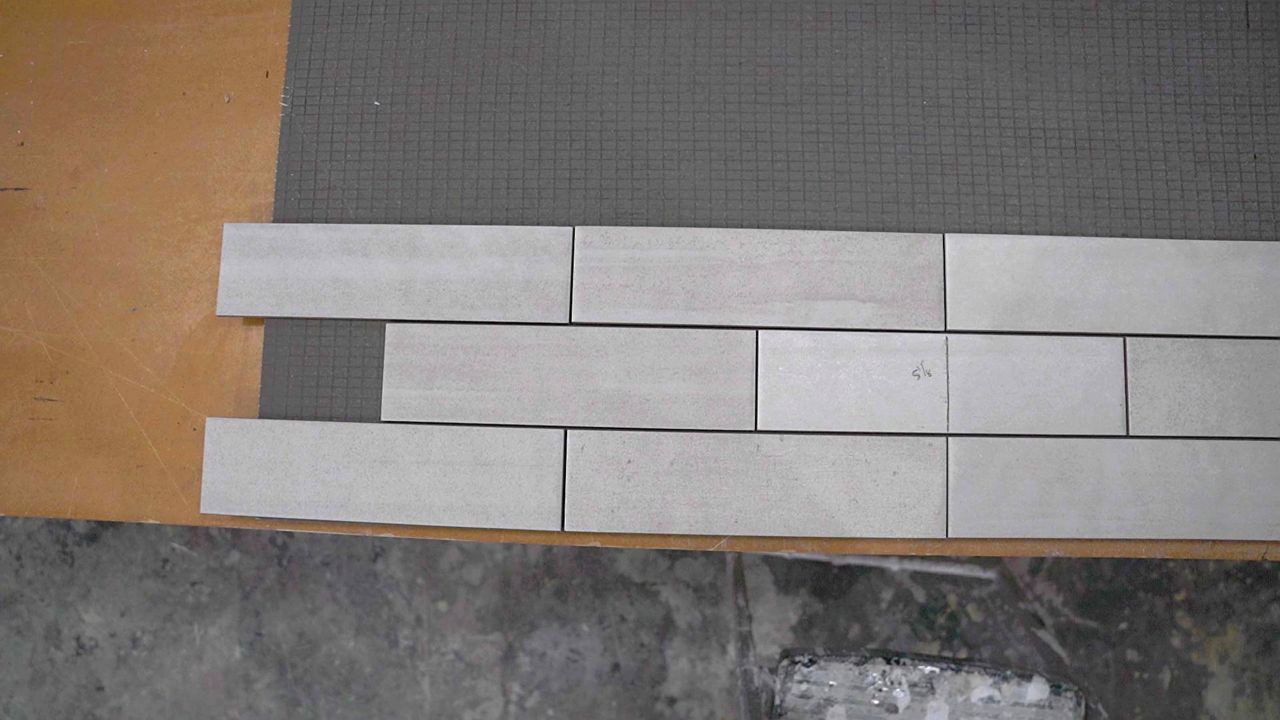
Step 5: Plan Your Tile Layout
Starting on the back wall, measure across left to right. Divide that measurement by the tile size plus the spacer size. This will tell you how many full tiles will fit along your back wall.
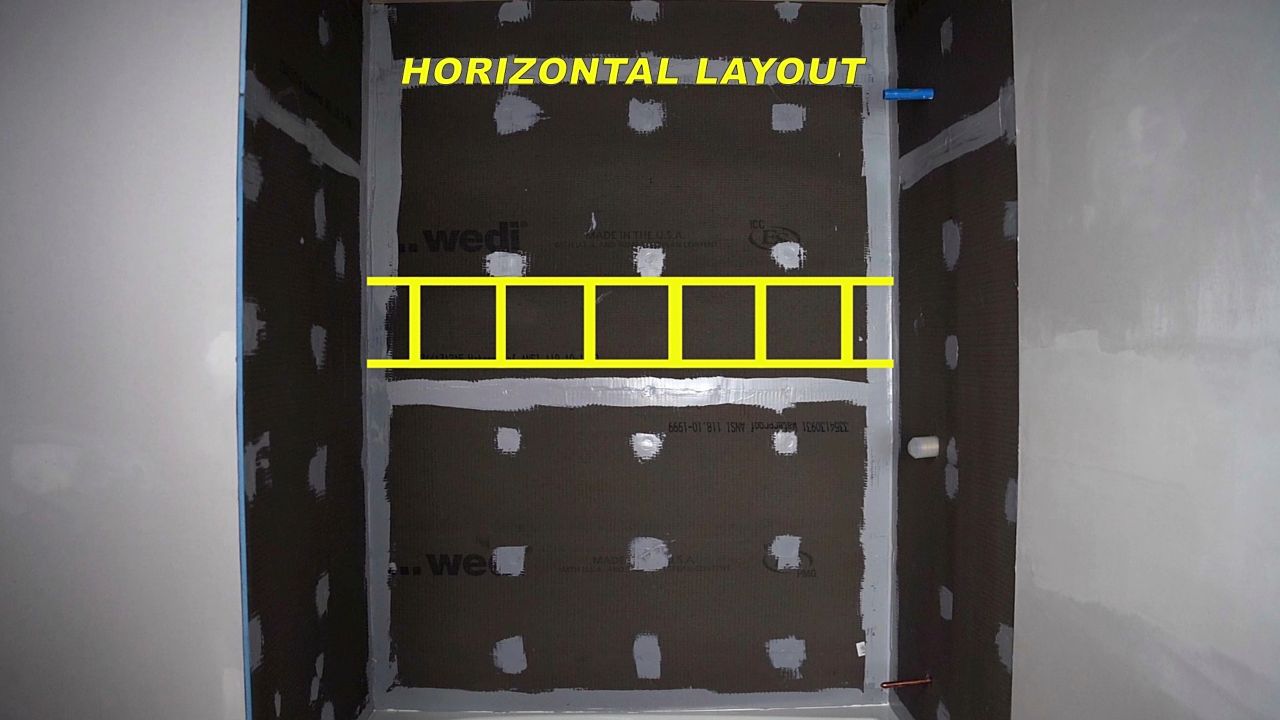
Next, find your center point on the back wall and either start a full tile from that center line or place a grout joint at that center line.
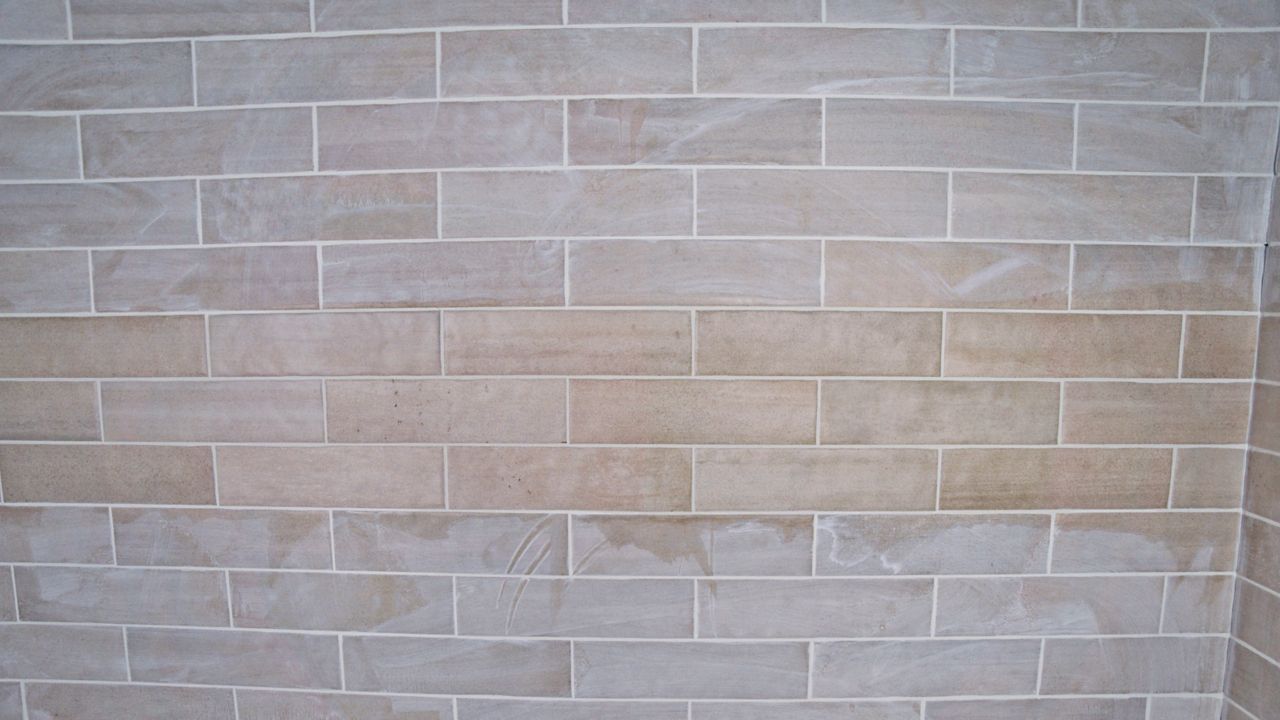
If you are doing a pattern, like the offset brick-lay pattern (running bond) for this demonstration, you will want to make sure the layout works for that specific pattern. Since we are doing an offset brick-lay pattern that alternates tile positions every other row, I will be checking how the layout falls for two rows of tile.
Using a level, position your ledger board for your first row of tile, starting at least one tile’s height up from the base of your shower. Note where your wall studs are, and screw into studs along the ledger board.
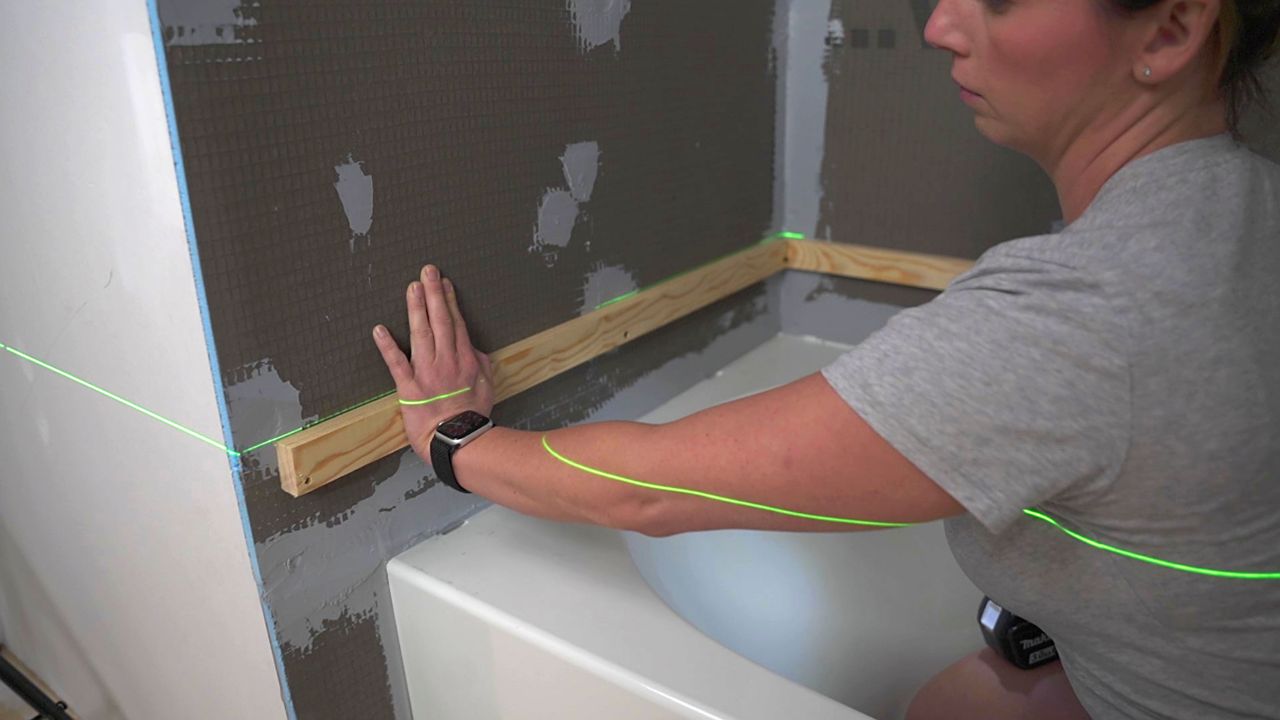
Important: After removing your ledger board, remember to waterproof the holes with waterproof sealant before you install the final row of tile.
Step 6: Mix Thinset Mortar
When mixing thinset mortar, always follow the instructions provided by the product’s manufacturer. In addition to mixing, instructions may also require a “slaking” period, which is the amount of time the mix may need to rest. Always check the instructions for the thinset you’re using to see if this step is needed.
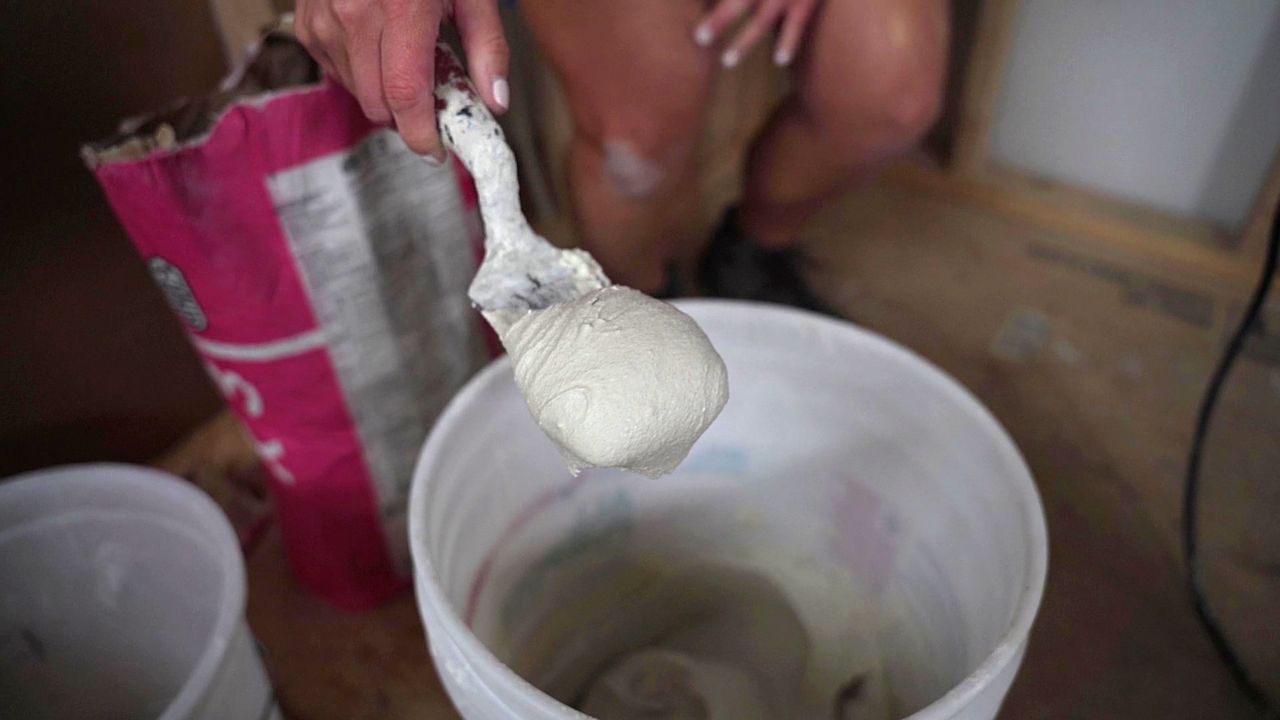
Once you’re done mixing, check the consistency with your margin trowel. Thinset mortar should be a creamy consistency that is not too runny, not too thick, and free of clumps and dry powder.
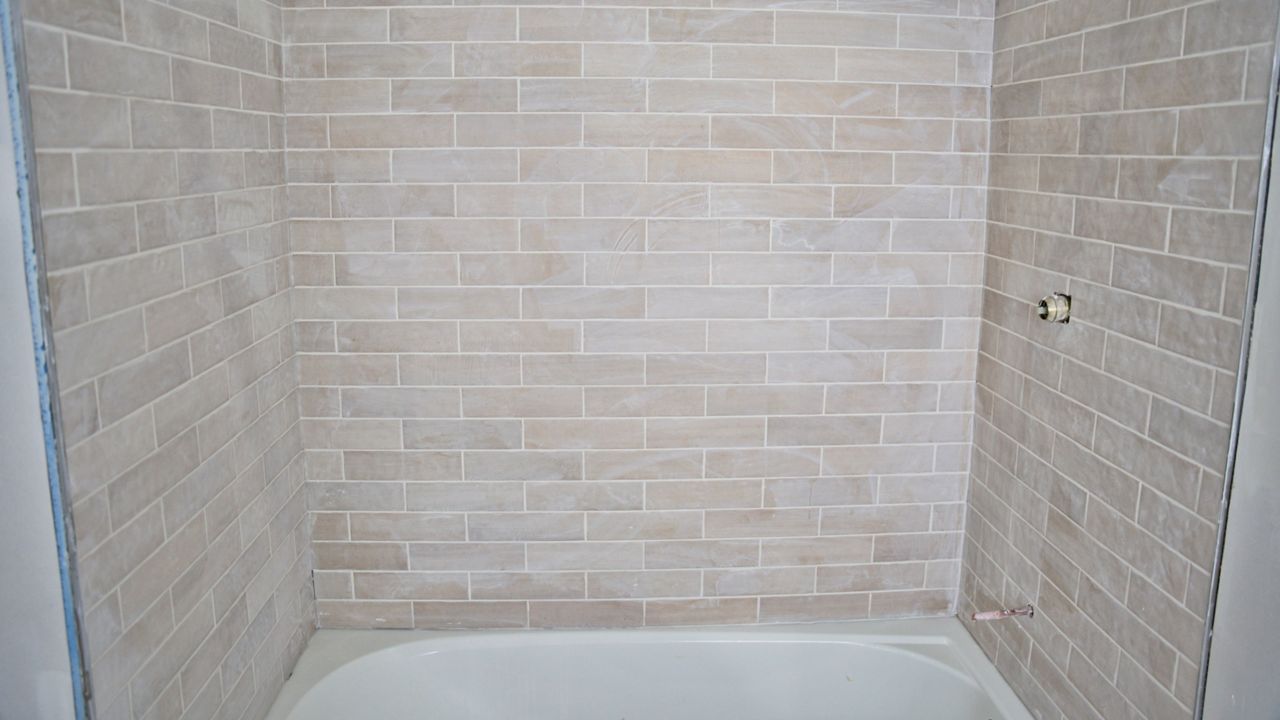
Step 7: Lay Your Tile
We’re finally at the most exciting part! When your thinset mortar is ready to go, it’s time to begin tiling.
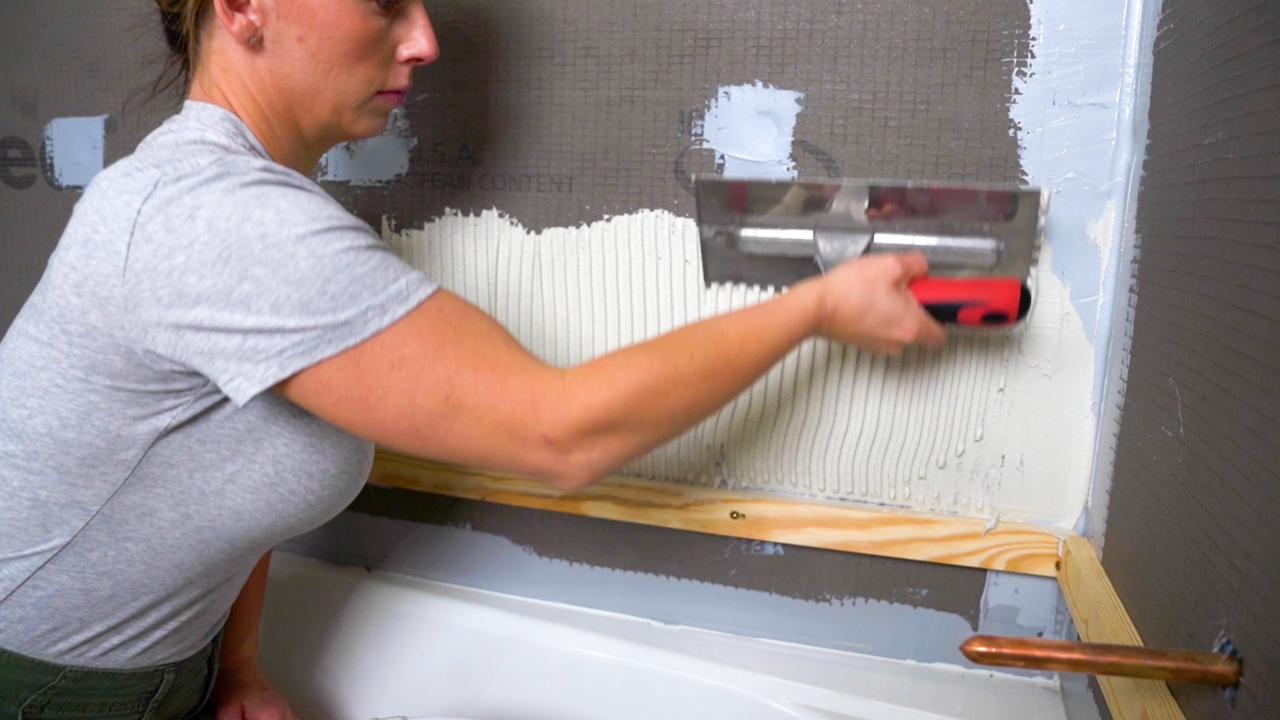
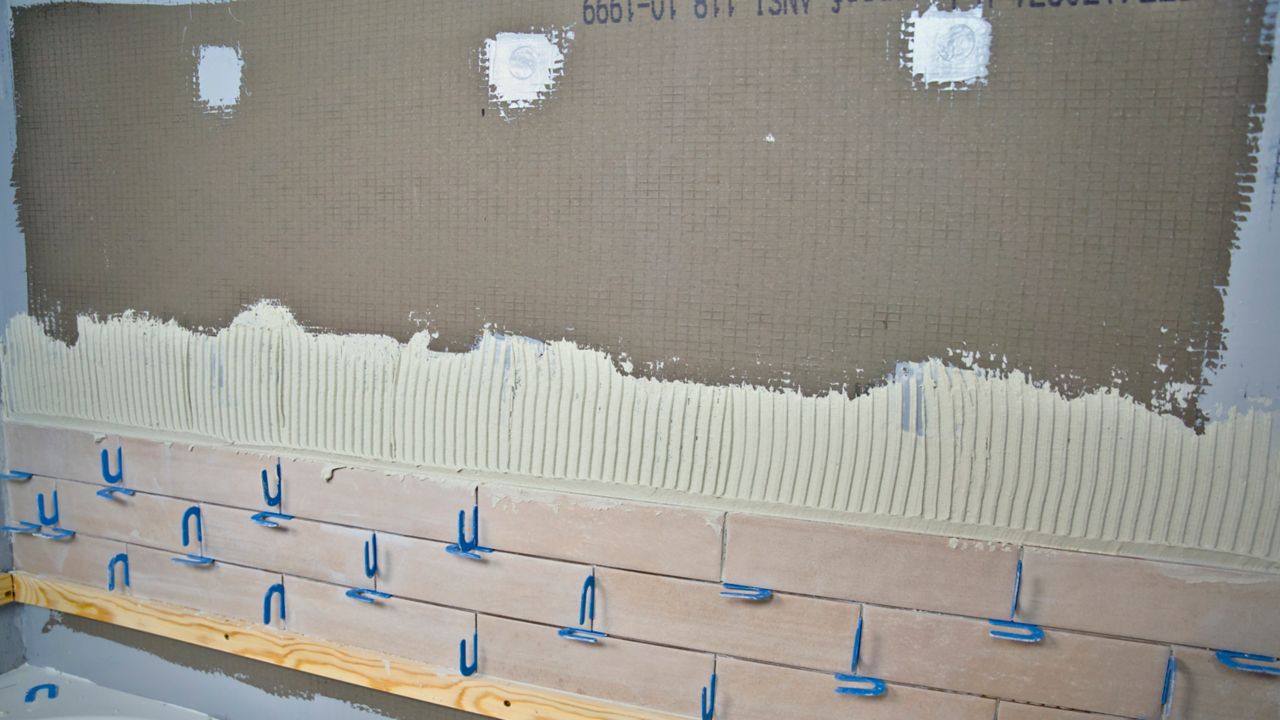
Burn Thinset Onto Wall
To “burn in” thinset means to apply a thin layer using the flat side of a trowel, and it’s the first step in laying tile. Place a good amount of thinset onto the flat side of your trowel and apply a thin, even layer along the wall where you will be setting your first row of tiles.
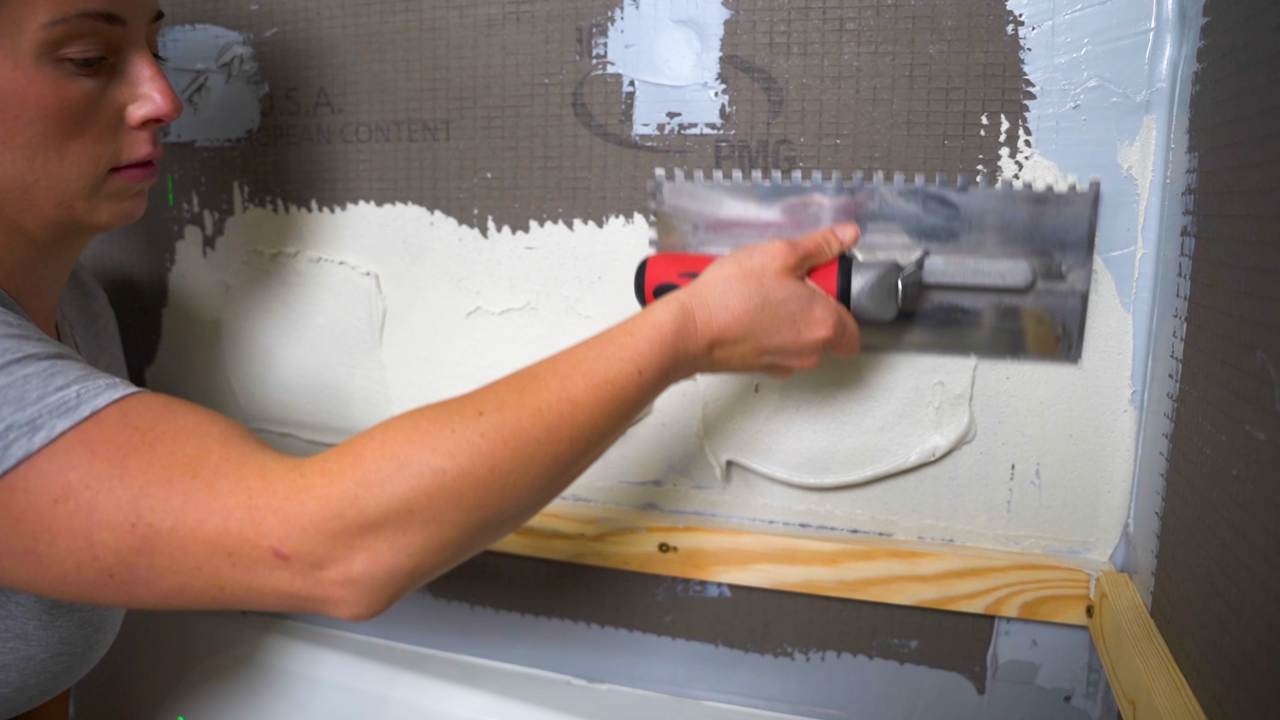
Burning in thinset promotes better coverage behind your tile installation, and is especially important in a wet area like a shower.
Directional Troweling
Apply more thinset mortar to the wall using the flat side of your trowel, and then immediately go back over the same area using the notched side of the trowel. This is called “directional troweling.” All of your notches should run in the same direction, and be parallel to the shortest edge of the tile you are laying. (This ensures that when you press each tile into the mortar, you get a secure hold.)
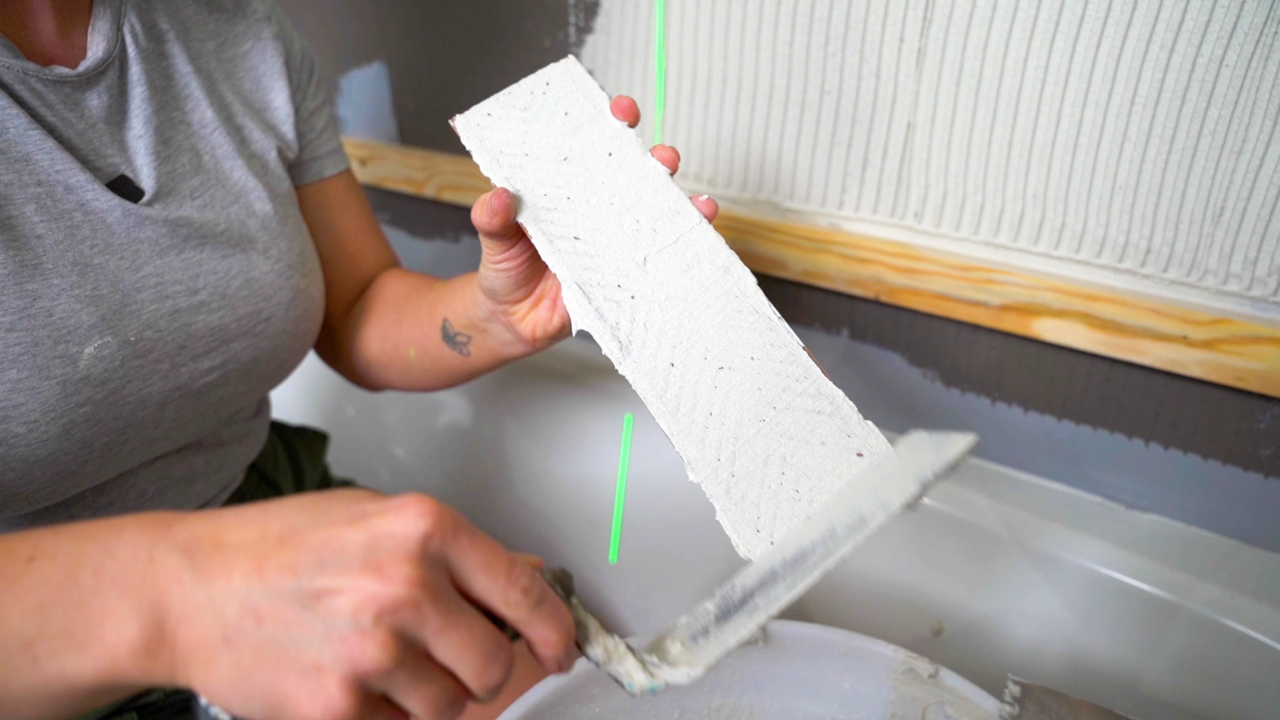
Burn Thinset Into Tiles
To get the best thinset coverage and strongest tile bond possible, it is best practice to burn in thinset to the back of each of the tiles you lay. Do this by using the flat side of your trowel to apply a small amount of thinset.
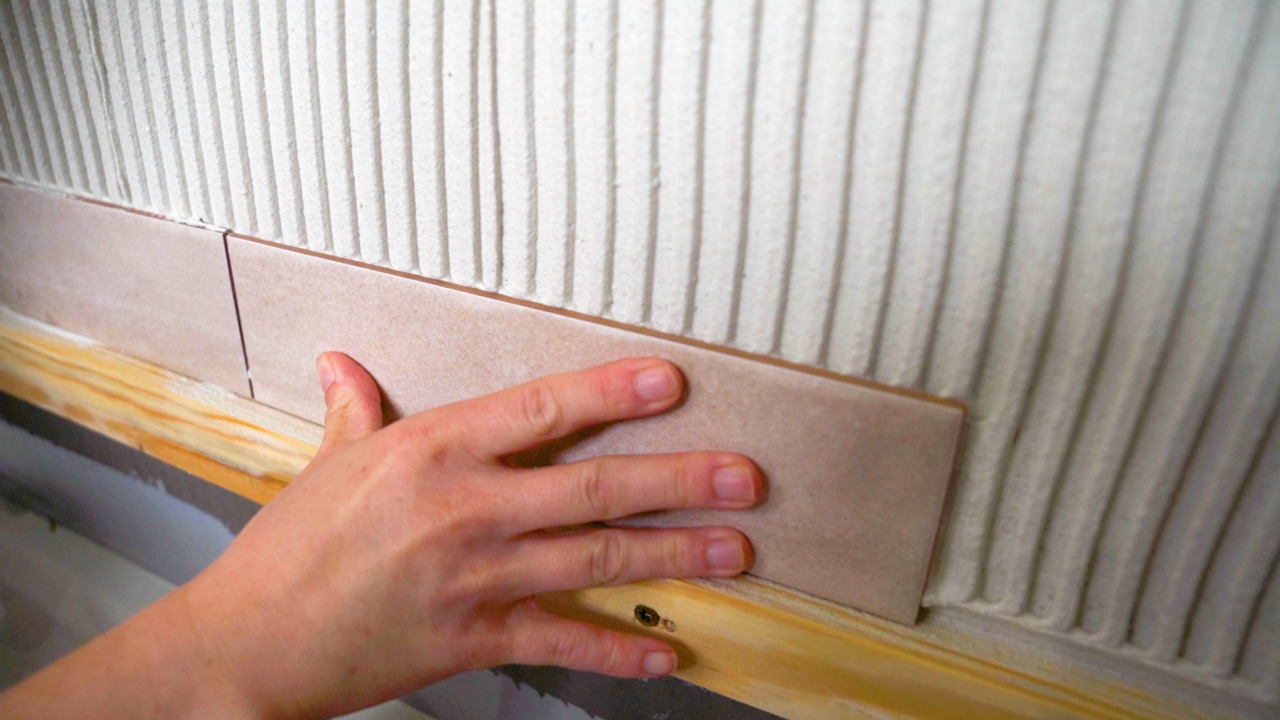
Lay First Row of Tile
Place the first tile along the layout line and collapse the thinset fully by moving the tile back and forth in the opposite direction of your trowel lines. This will remove the air from behind your tile and give you the desired coverage for a shower, which is 95%.
Check for Appropriate Thinset Mortar Coverage Behind Your Tiles
As you lay your first row of tiles, you will want to remove a tile to check if you are getting the proper amount of thinset coverage on the back of the tiles. The TCNA states that it is required that tiles in a wet area have a minimum of 95% coverage. That will mean you should not see the notches transfer on the back of your tile; it will look more like mountains if you are getting the right amount of coverage.
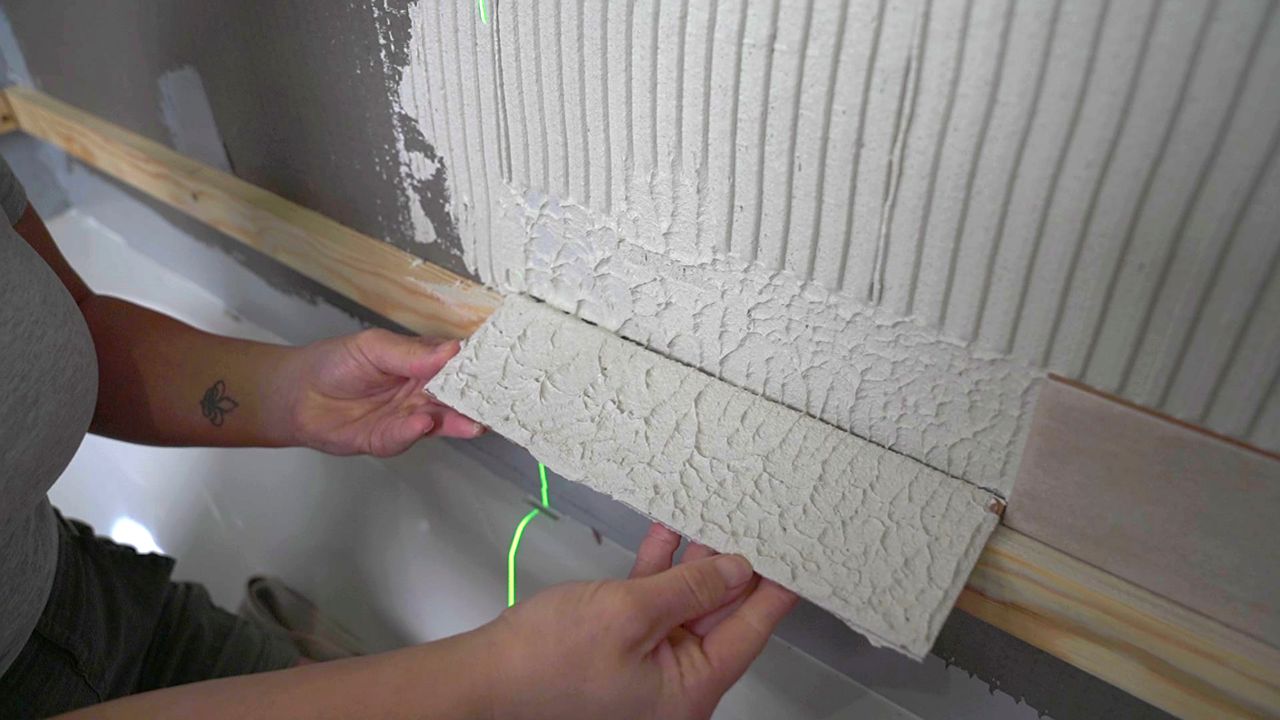
If you can still see traces of notch lines in the thinset, you are not getting proper coverage. Switch to the next largest size of notched trowel, and try applying the tile again.
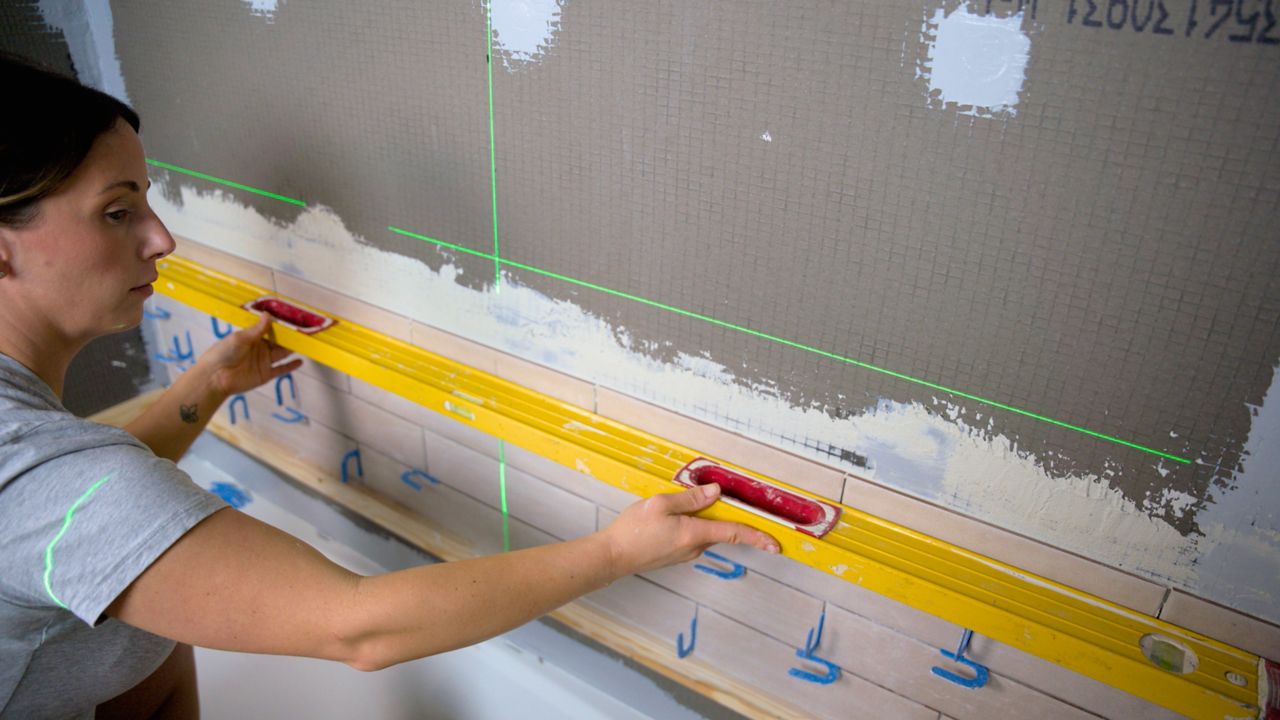
Inspect Tiles
After you’ve finished tiling a row in your shower, take a step back and check that your tiles are level before continuing. You can ensure that your tiles are staying level by placing your leveler on the edge of the first row you tiled. You can do this with every row or every few rows and make adjustments if needed.
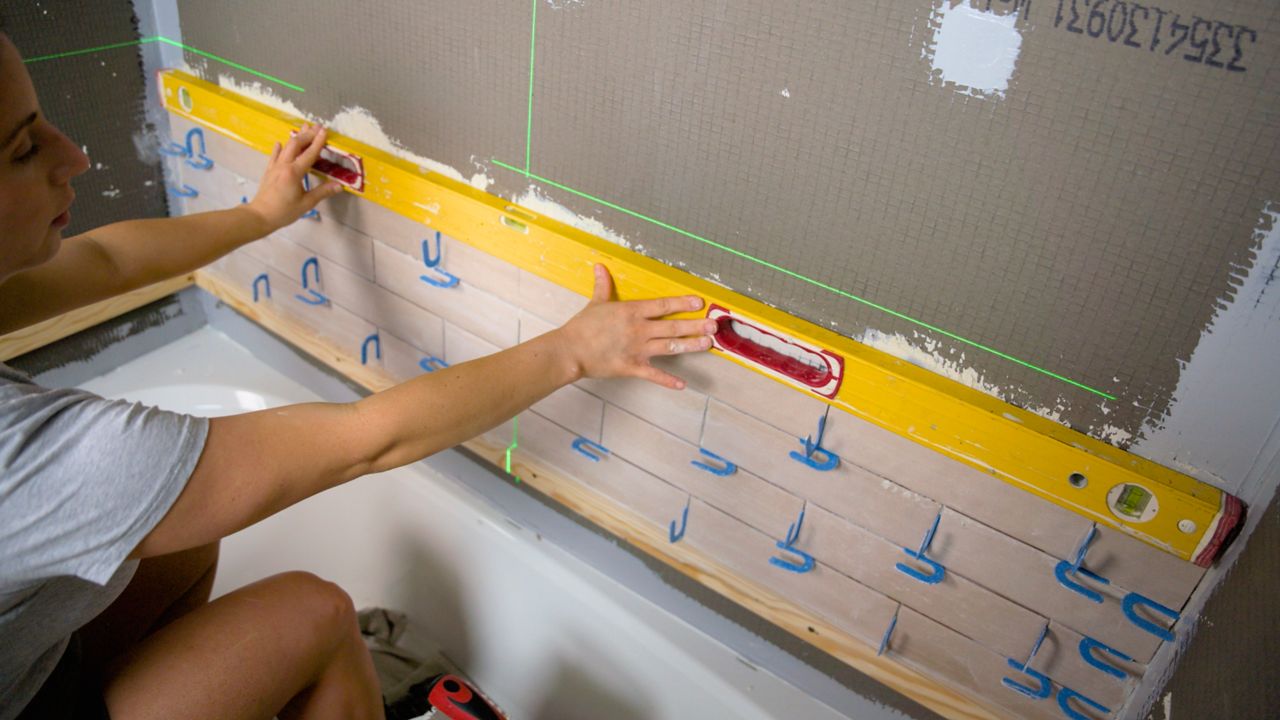
Additionally, you will want to check the surface of the tiles to ensure that they are staying flat and free of lippage as you tile up the surface of the wall.
Place Spacers
After you have checked that the first row of tiles have appropriate thinset mortar coverage, ensuring they are flat and level, you can add your spacers. If tiling to a ledger board, you will not need to add spacers to the horizontal grout joint, only the vertical.
If tiling to a ledger board: You will tile the entire wall and remove the ledger board at the end. Once you remove the ledger board, you will then tile in your final row(s) at the bottom and accommodate for expansion at the tub or shower pan with at least a 1/8” spacer.
Step 8: Cutting Tile
At some point when tiling your shower, you will need to consider cutting your tiles. I would recommend a manual snap cutter, a wet saw, and some hole saw bits for making your cuts.
- Manual snap cutter. Can be purchased in various sizes and used on ceramic or porcelain tiles. Note: If you chose to install a mosaic sheet tile or natural stone, a manual snap cutter would not be the best route for you.
- Wet saw. A wet saw will be your most versatile option. It can get the job done on almost any tile material, the only limitation being the size of the tile you choose to install
- Diamond hole saw bits. When tiling a shower, you will need a diamond hole saw bit to make circular cutouts in your tiles for shower heads and tub spouts. You can purchase these as an add-on bit to your drill/driver or as an add-on to your angle grinder.
See our article on How To Cut Tile for detailed instructions and helpful tips on cutting different types of tiles with various types of saws.
Step 9: Finish Tile Edges
Tile edges are present at locations where a plane of tile ends, such as where the drywall outside your shower begins, where a shower niche meets the main shower wall, or around a shower bench. Finished tile edges will elevate the overall look of your shower and give it a more complete finish. When considering how to finish your tile edges, you have a few choices:
- Bullnose tile. Some tiles offer matching bullnose styles, which means one side of the tile is rounded and shows no raw tile edge.
- Pencil tile. Pencil tiles are small, thin pieces of tile that can frame the borders of a larger tile installation. Similar to bullnose tiles, many tiles offer matching pencil pieces.
- Tile profiles. Tile profiles have become increasingly popular due to their versatility and streamlined appearance. They come in many finishes and colors, making it easy to accent your shower finishes (such as the shower head, shower valve and tub spout) or match it completely to your tile or grout choice.
These are all effective options for finishing tile edges, and your decision will ultimately come down to your personal design preferences. For more information and detailed instructions, check out How to Finish Tile Edges: 3 Go-To Techniques.
Step 10: Clean Tile Surfaces and Grout Joints
After you have allowed your thinset to cure according to manufacturer instructions, you will need to thoroughly clean the surfaces of your newly installed tiles, as well as the spaces left for grout joints, before you move on to grouting.
Cleaning Supplies
To clean your tile, you will need:
- Clean bucket of water
- Clean sponges
- Dry microfiber rags
- Grout Brush or toothbrush
- Pick or utility knife
- Scrubbing sponge
- Glass cleaner
How to Clean Tiles Before Grouting
Begin by removing all your tile spacers. If you see any areas where thinset may be sticking out of your grout joints, you can start by trying to scrape it out with the grout brush or toothbrush.
If it’s too dry, you may need to use your pick or utility knife. Be careful as you can chip a tile with these tools.
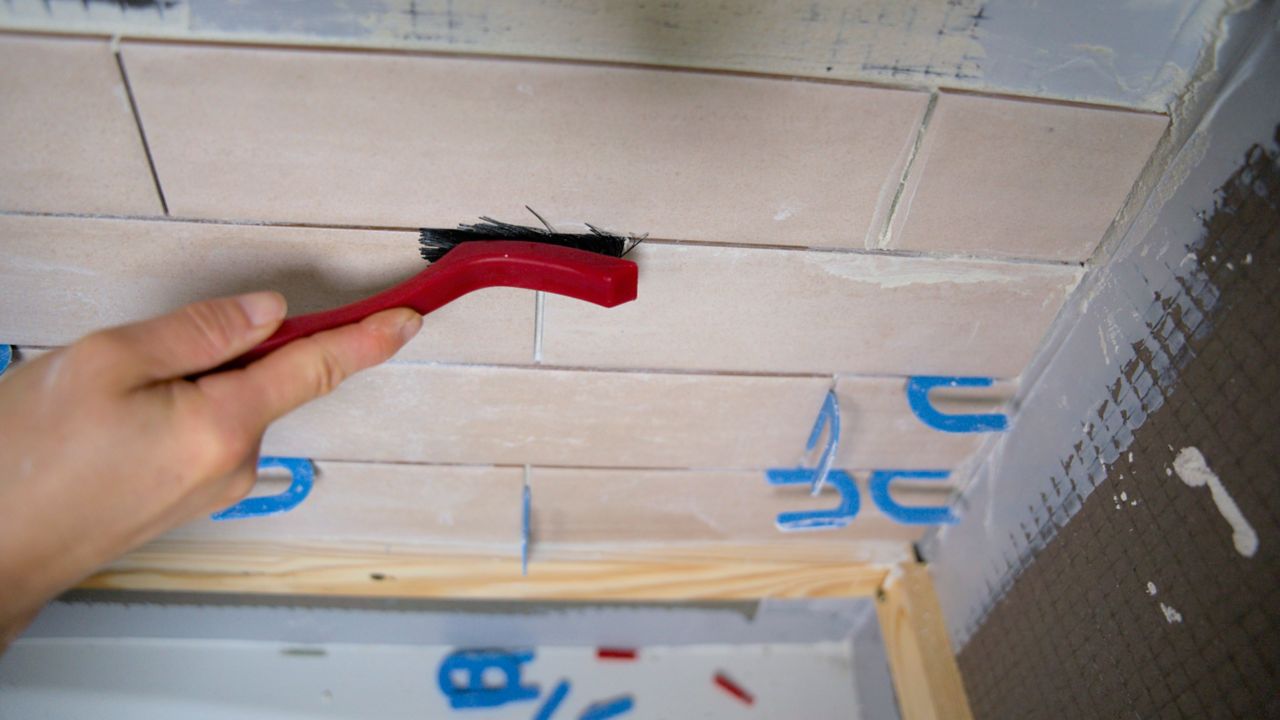
Next, you can start scrubbing with your green scrubbing sponge. Afterwards, follow up with your soft sponge.
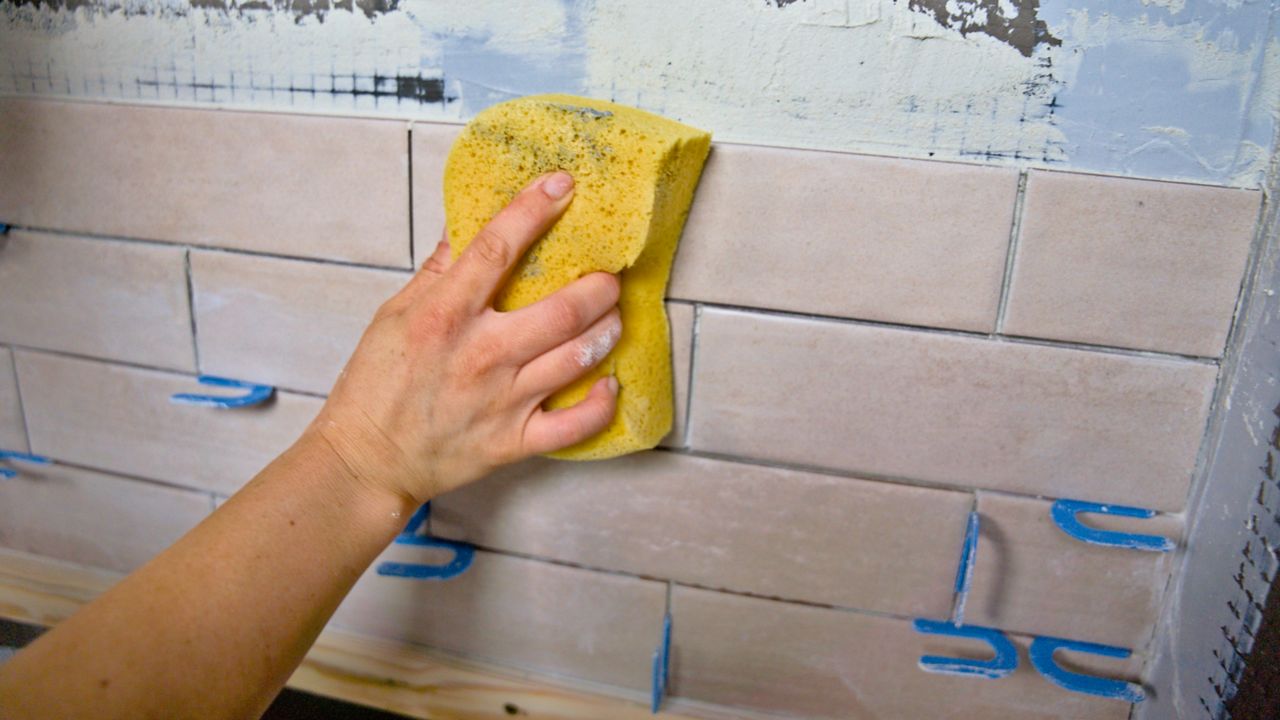
After you finish sponging the shower and it dries, you may notice a film still present. To remove that film, use an ammonia-free glass cleaner or simple green and your dry clean microfiber rag to clean the surface of your tile

Once you are done cleaning, double-check you have not missed any chunks of thinset in the grout joints that may protrude and hinder your grout from filling up a joint completely. If you do see spots, repeat the steps in this section for that area.
Step 11: Grout Your Tile
After you have finished cleaning your tile and checking for any built-up thinset left over from tiling, you are ready to grout.
Before you begin, you will need to mix up your grout. When mixing grout, always follow the instructions provided by the product’s manufacturer. In addition to mixing, instructions may also indicate how long the grout will need to sit on the wall before beginning your first clean. Always check the instructions for the grout you’re using before beginning the grouting process.
Begin by placing some grout on your grout float using your margin trowel.
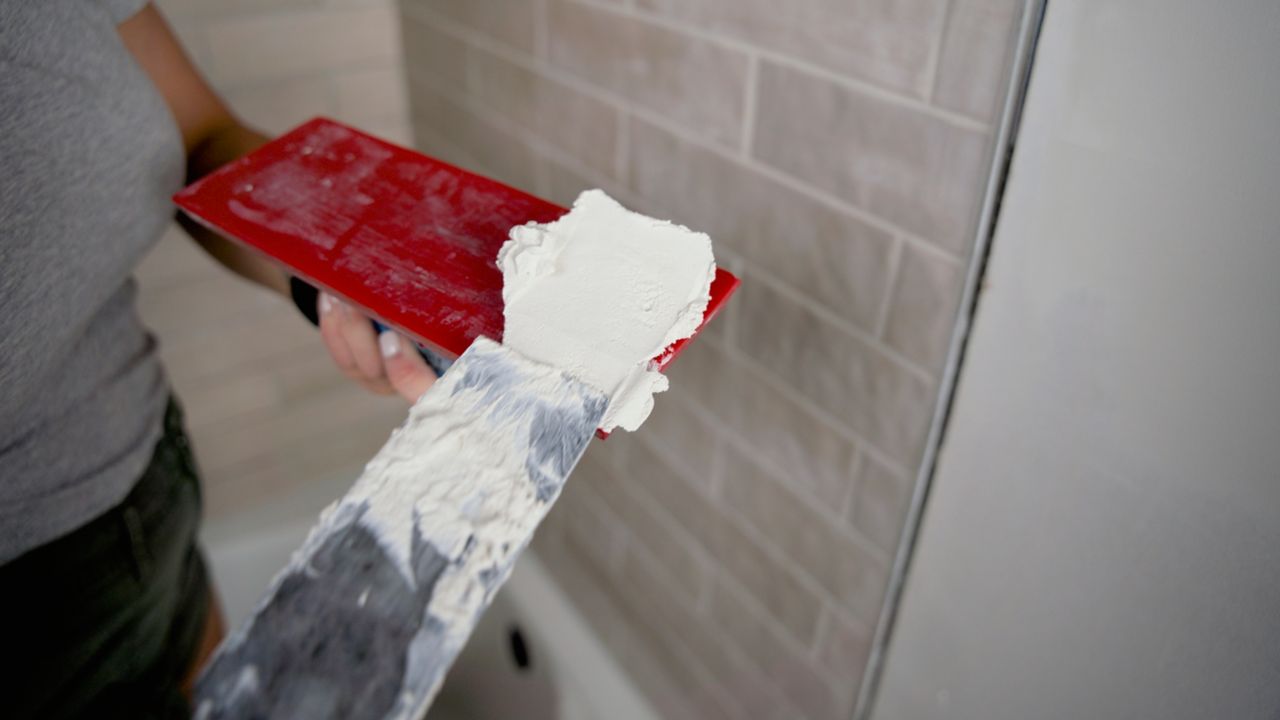
Apply grout to your tile walls, starting with the short side of the grout float.
Go back and use the long side of the grout float to really fill up the grout joint and wipe away a majority of the grout from the surface of your tile.
Continue with these steps for the entire shower, paying special attention to inside corners to make sure they don’t get filled with grout. These areas need to be left clear for expansion, and will be filled with silicone later.
If needed, use a grout brush with some water to clean any grout from inside corners before it dries.
Once your walls are grouted, let the grout dry for the specified time allotted by the grout of your choice. You can check if the grout is dry by touching it with your finger.
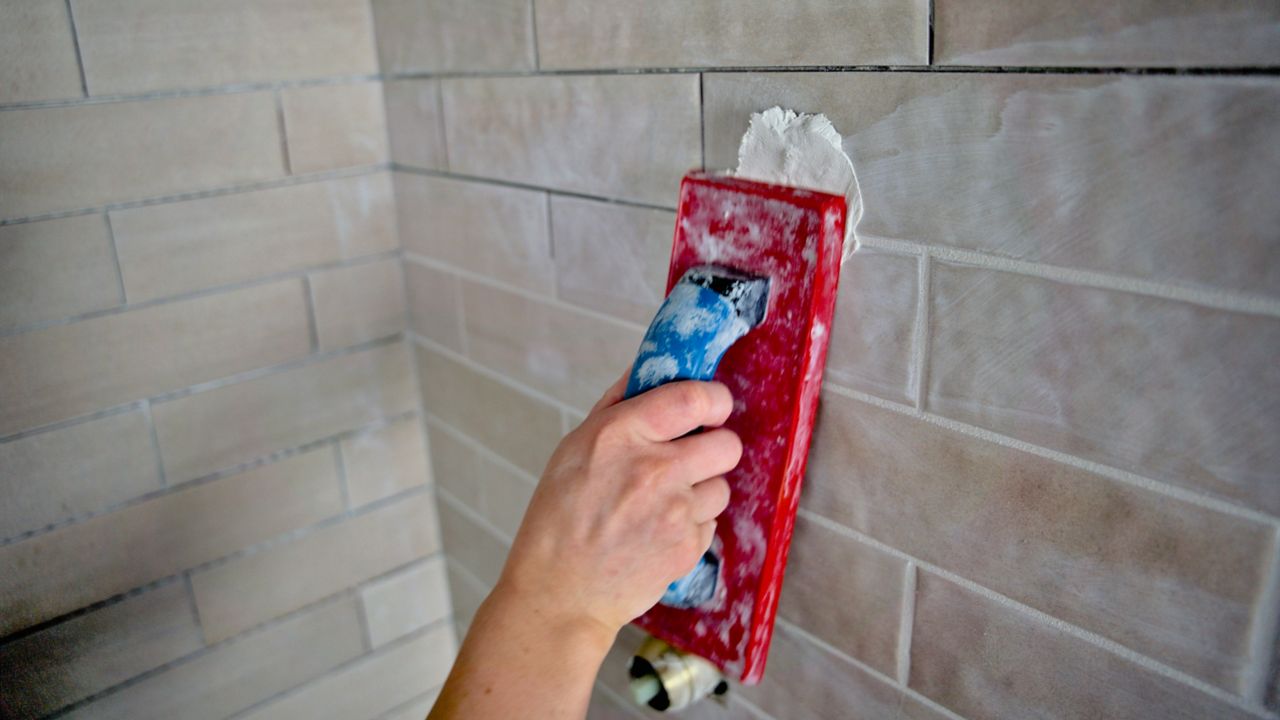
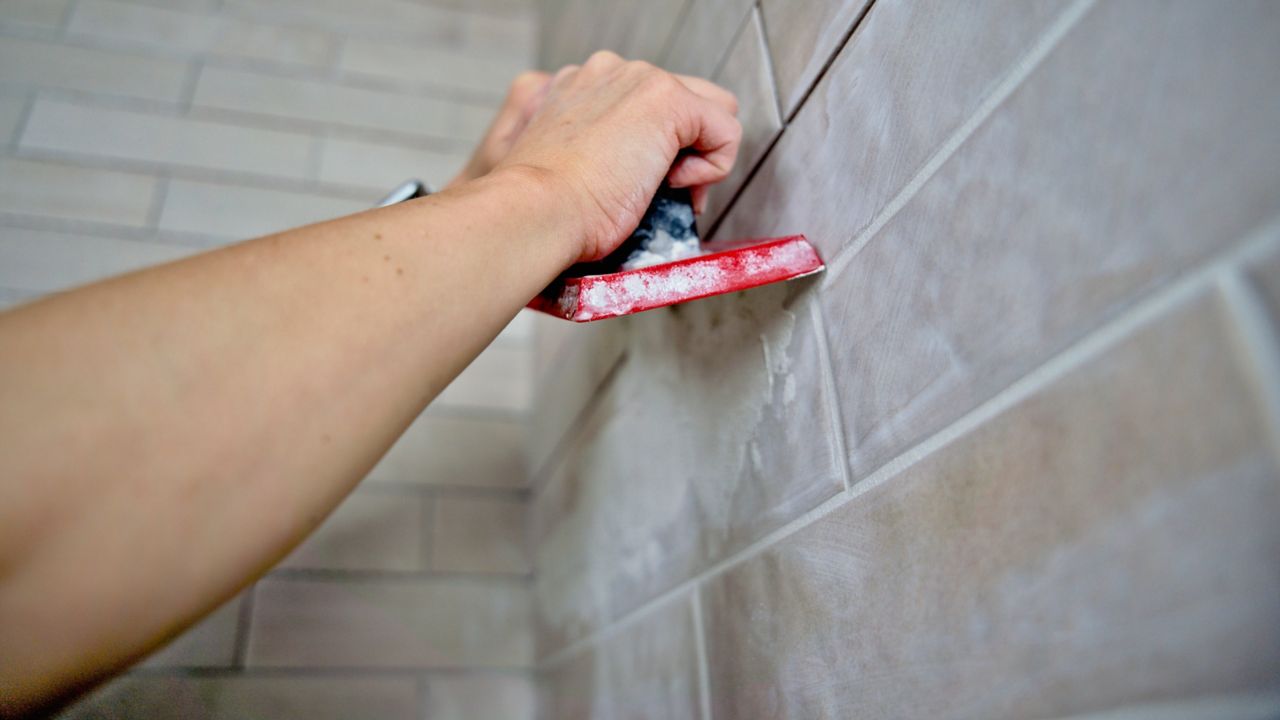
Step 12: Clean Surface Grout
Once the grout is dry, use a clean damp sponge to begin the process of cleaning the surface of your tile. Using circular motions, clean the surface of your tile, flipping your sponge and rinsing in clean water periodically.
Continue these steps until all the surface grout is cleaned off your tile.
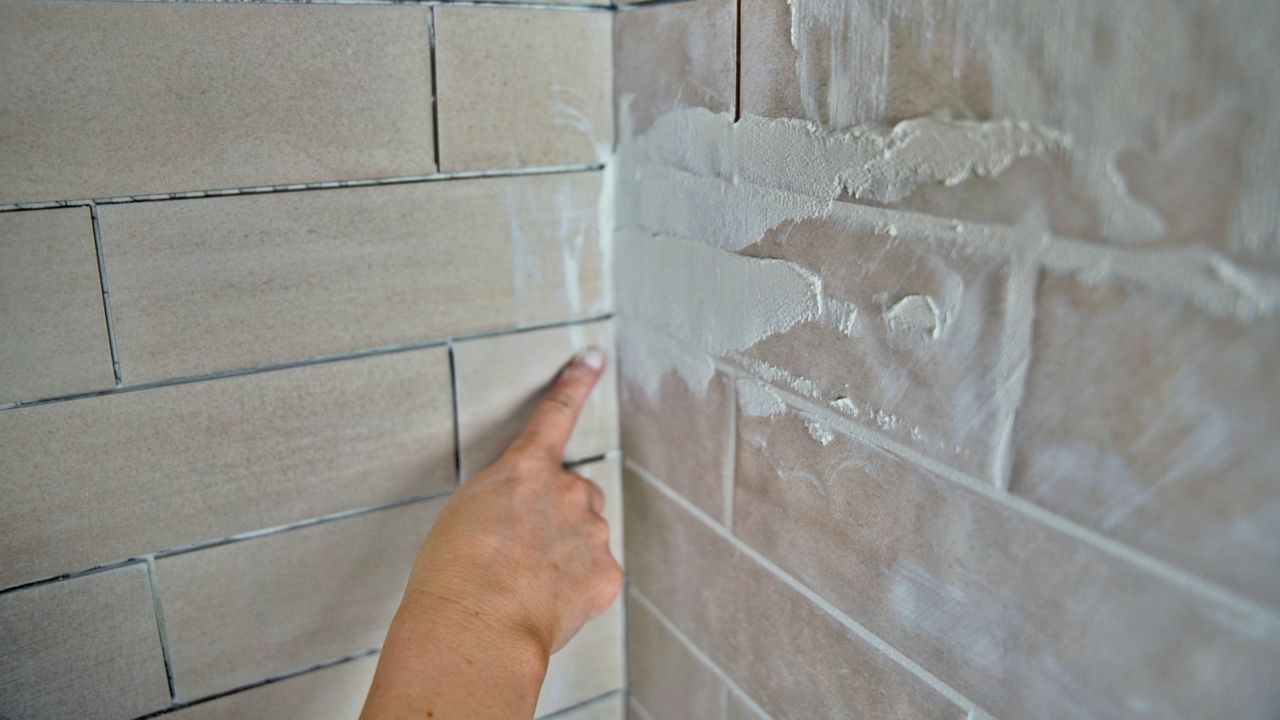
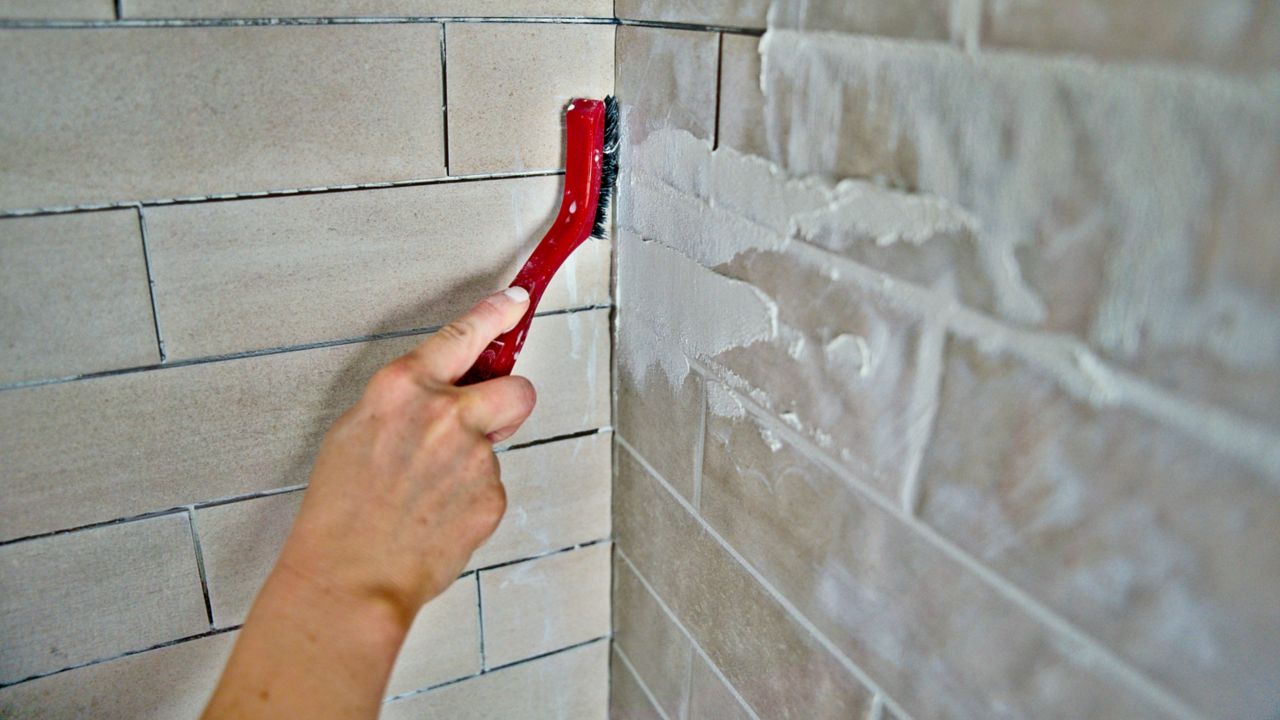
Step 13: Remove the Grout Haze
Once your initial clean is complete, your shower will end up with a sort of film on the surface. This film is called “grout haze.”
To remove the grout haze from your tiles, grab two buckets of water, a clean sponge, and a dry microfiber towel.
After years of practice removing grout haze, my best tip is to use two buckets during this step: one for dirty water, and one for clean. To keep the water in the second bucket clean, I only wring my sponges out over the dirty water bucket.
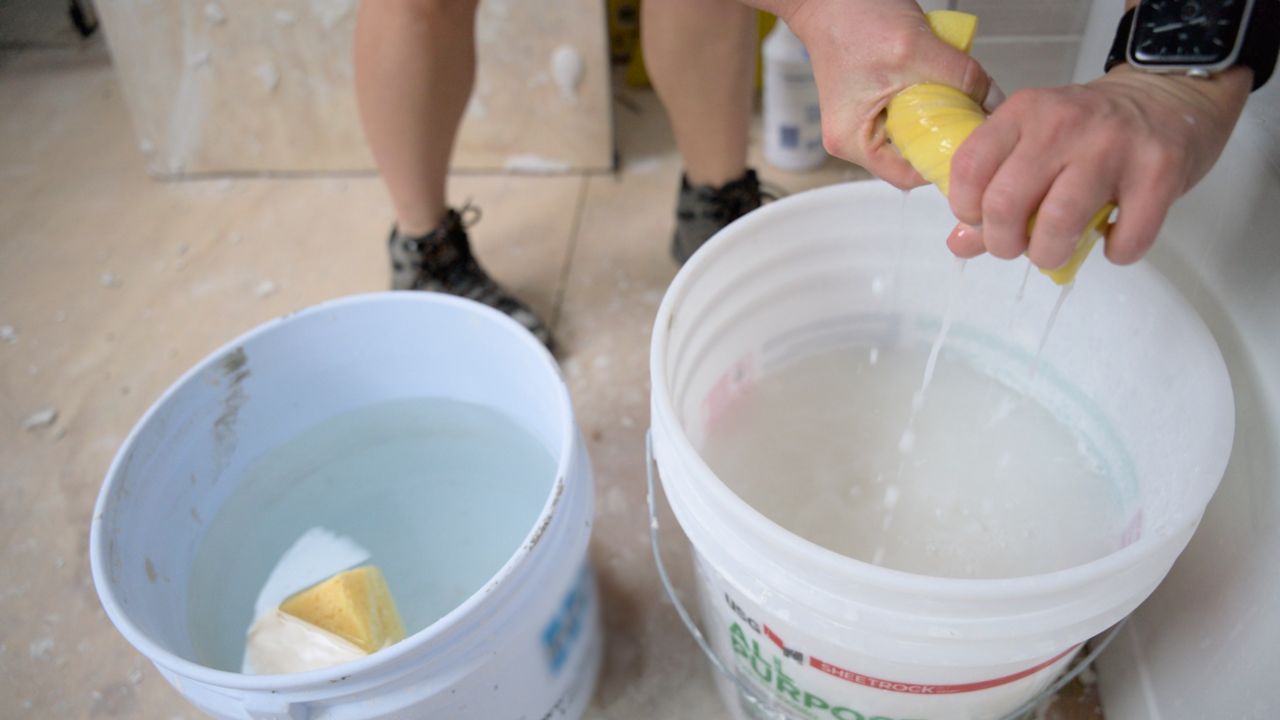
Here’s how it works: I dunk my dirty sponge in the dirty water bucket and wring it out. Then, I dunk the same sponge in the clean water bucket and wring that excess water out over the dirty water bucket, too. This ensures I am only applying clean water to my walls, which cuts down on the grout haze.
Begin cleaning by using a damp sponge on the surface of your tile. Follow up each section that you have sponged with a dry microfiber. Repeat until all walls are complete.
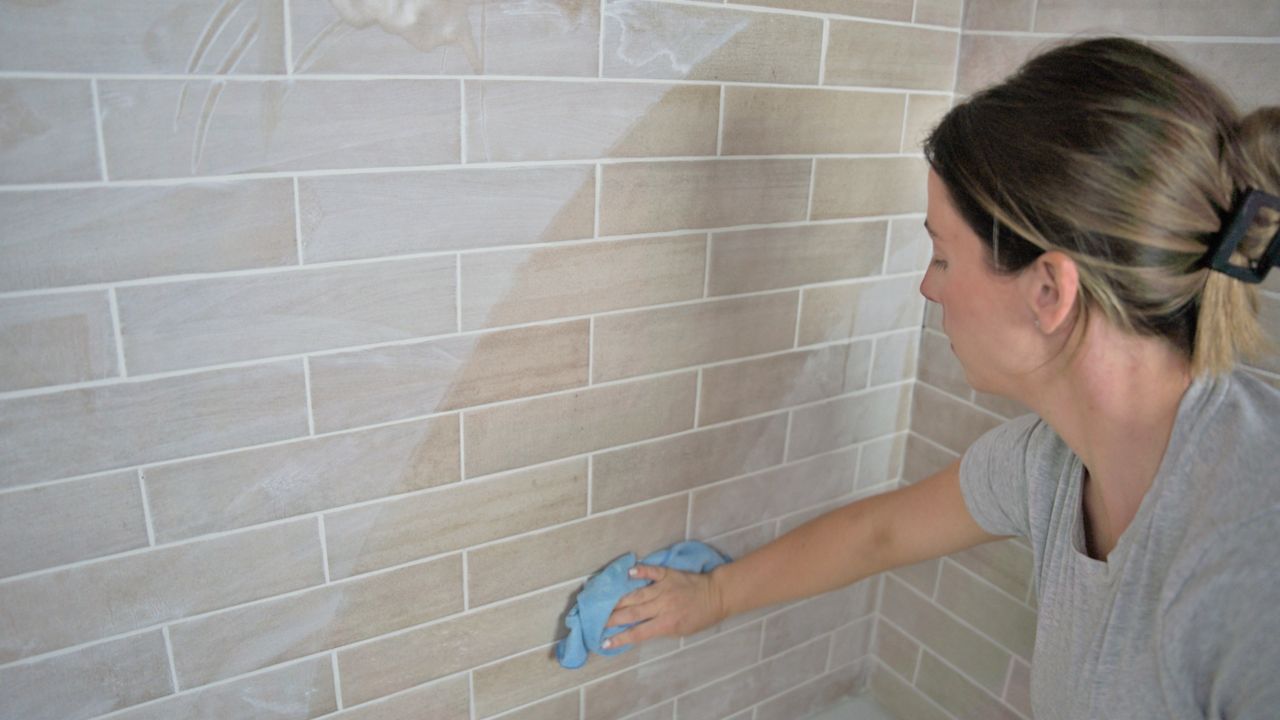
Once all walls are cleaned and dry, you should be able to see if all grout haze has been removed. If you have stubborn grout haze, you can follow up with a grout haze remover.
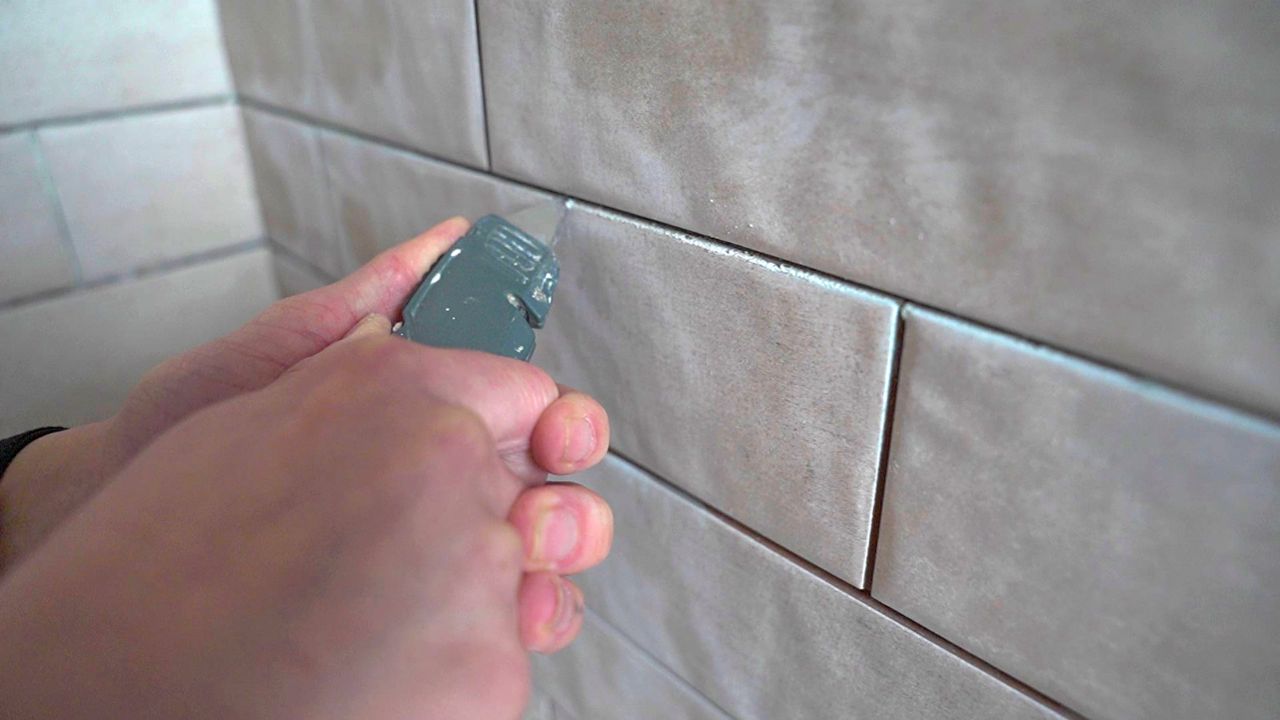
Step 14: Seal With Silicone
The final step in the process of tiling a shower is to silicone the changes of planes for expansion. We are using a silicone sealant that matches the grout and placing it where the walls meet the tub and on the inside corners.
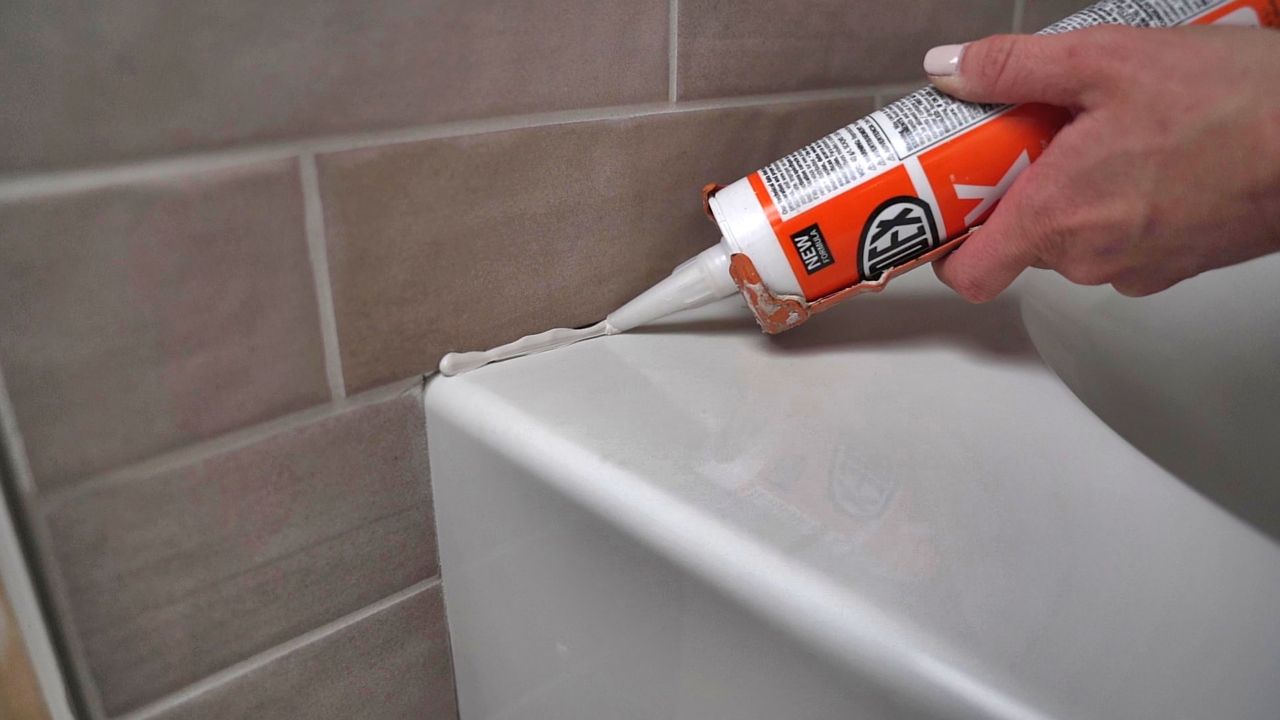
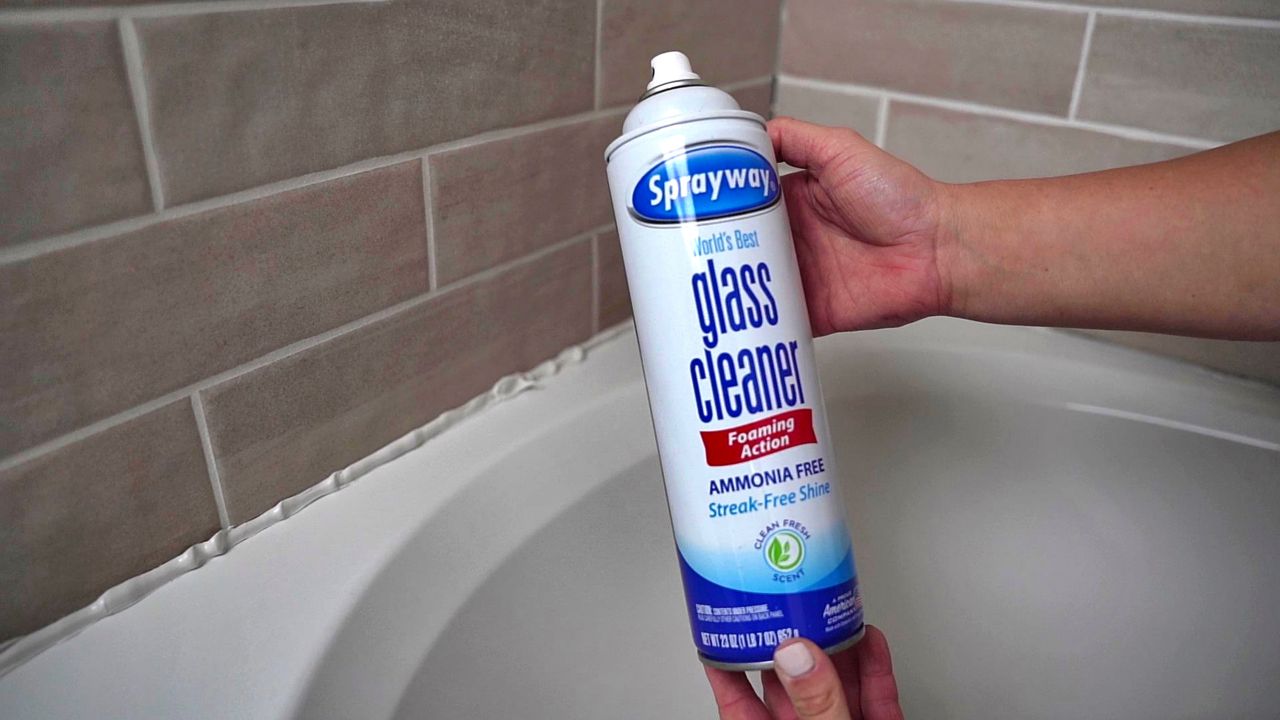
First, lay a generous bead of silicone. Next, spray ammonia-free glass cleaner on the bead. This helps to stop your silicone from sticking to the surfaces around the area you are working in.
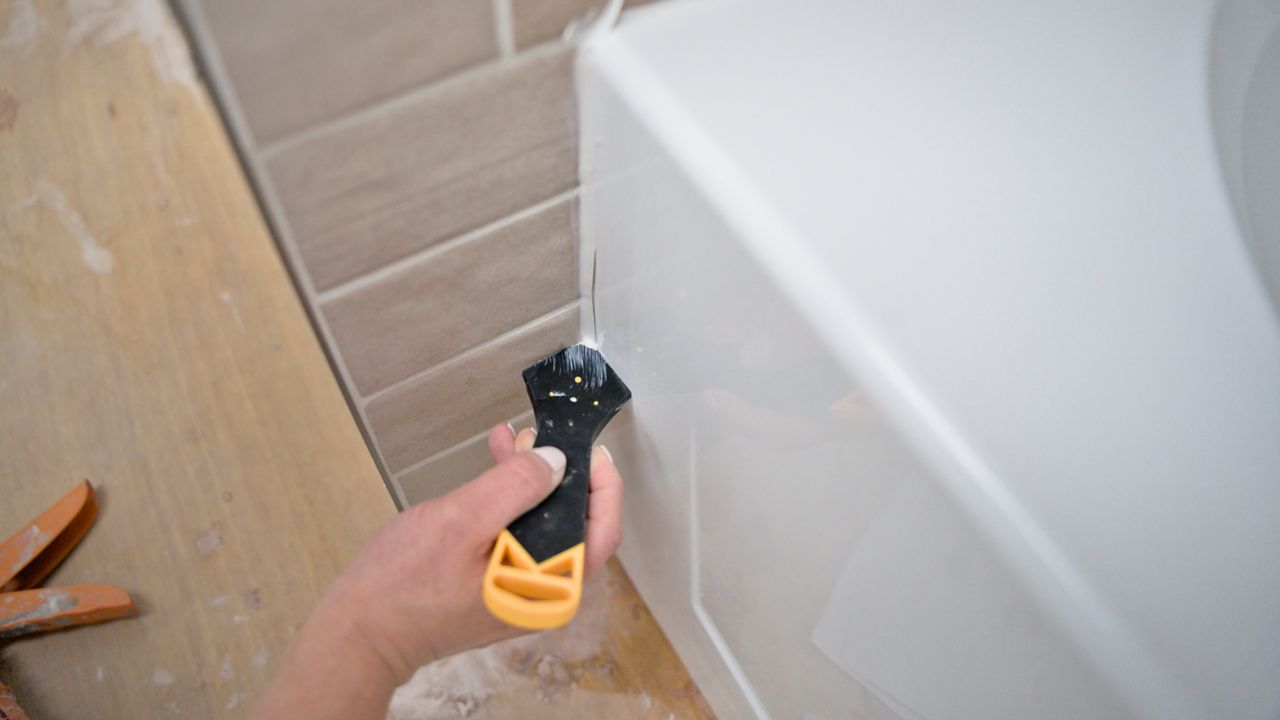
The last step is to use a caulking tool to press the silicone into your joint and slowly remove any excess, being sure to wipe the tool often to avoid the silicone from spilling over on your tile or tub surface.
Allow your silicone to dry for at least 48 hours before turning your shower on or installing your shower fixtures.